

mysql主从复制
- 主的可以读和写
- 从的只读模式
通常来说是在不同的机器上。没必要一开始就上高可用,先是单机的,觉得不安全,扛不住,可以上主从。如果人多了,可以上高可用。
拉取基础镜像获取配置
我们先拉取一个镜像,并且跑起来,拷贝出来默认的配置,为后面的主从配置进行准备。
docker pull mysql:5.7.30
然后跑
sudo docker run -p 3306:3306 --name=sob_test_mysql \
-e MYSQL_ROOT_PASSWORD=123456 \
-d mysql:5.7.30
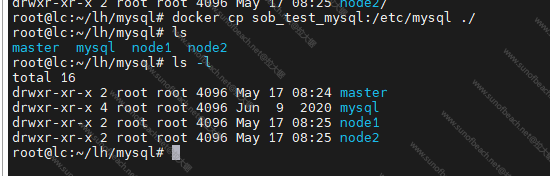
复制配置文件出来
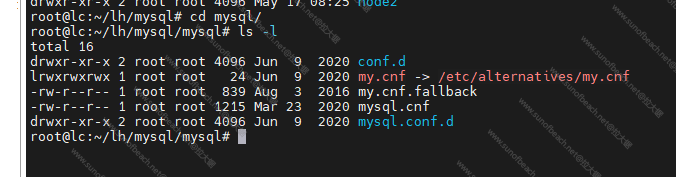
有了这套东西,我们就可以基于配置去搭建主从复制
搭建主从复制
我这里是一主机,二从机
首先是创建了三个目录master、node1、node2
把配置复制到各个目录下:
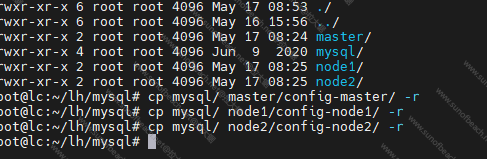
修改master的配置conf-master/mysql.conf.d/xxx.conf
# This program is also distributed with certain software (including
# but not limited to OpenSSL) that is licensed under separate terms,
# as designated in a particular file or component or in included license
# documentation.  The authors of MySQL hereby grant you an additional
# permission to link the program and your derivative works with the
# separately licensed software that they have included with MySQL.
#
# This program is distributed in the hope that it will be useful,
# but WITHOUT ANY WARRANTY; without even the implied warranty of
# MERCHANTABILITY or FITNESS FOR A PARTICULAR PURPOSE.  See the
# GNU General Public License, version 2.0, for more details.
#
# You should have received a copy of the GNU General Public License
# along with this program; if not, write to the Free Software
# Foundation, Inc., 51 Franklin St, Fifth Floor, Boston, MA  02110-1301 USA

#
# The MySQL  Server configuration file.
#
# For explanations see
# http://dev.mysql.com/doc/mysql/en/server-system-variables.html

[mysqld]
pid-file        = /var/run/mysqld/mysqld.pid
socket          = /var/run/mysqld/mysqld.sock
datadir         = /var/lib/mysql
#log-error      = /var/log/mysql/error.log
# By default we only accept connections from localhost
#bind-address   = 127.0.0.1
# Disabling symbolic-links is recommended to prevent assorted security risks
symbolic-links=0

# 服务在集群中的ID (全局唯一)
server-id=1

# 是否只读
read-only=0

# 忽略的BinLog 库
binlog-ignore-db=information_schema
binlog-ignore-db=mysql
binlog-ignore-db=performance_schema
binlog-ignore-db=sys

# 跳过MySQL 反解析连接客户端的 DNS
skip-host-cache
skip-name-resolve


# BinLog 开启,配置 其名称前缀
log_bin=/var/log/mysql/mysql-bin.log
log-bin=mysql-bin
expire-logs-days=14
max-binlog-size=1024M

character-set-client-handshake = FALSE
character-set-server = utf8mb4
collation-server = utf8mb4_unicode_ci
init_connect='SET NAMES utf8mb4'
sql_mode ='STRICT_TRANS_TABLES,NO_ZERO_IN_DATE,NO_ZERO_DATE,ERROR_FOR_DIVISION_BY_ZERO,NO_AUTO_CREATE_USER,NO_ENGINE_SUBSTITUTION'

[client]
default-character-set = utf8mb4

[mysql]
default-character-set = utf8mb4
以上是master的配置
接下来看看node的配置:
# Copyright (c) 2014, 2016, Oracle and/or its affiliates. All rights reserved.
#
# This program is free software; you can redistribute it and/or modify
# it under the terms of the GNU General Public License, version 2.0,
# as published by the Free Software Foundation.
#
# This program is also distributed with certain software (including
# but not limited to OpenSSL) that is licensed under separate terms,
# as designated in a particular file or component or in included license
# documentation.  The authors of MySQL hereby grant you an additional
# permission to link the program and your derivative works with the
# separately licensed software that they have included with MySQL.
#
# This program is distributed in the hope that it will be useful,
# but WITHOUT ANY WARRANTY; without even the implied warranty of
# MERCHANTABILITY or FITNESS FOR A PARTICULAR PURPOSE.  See the
# GNU General Public License, version 2.0, for more details.
#
# You should have received a copy of the GNU General Public License
# along with this program; if not, write to the Free Software
# Foundation, Inc., 51 Franklin St, Fifth Floor, Boston, MA  02110-1301 USA

#
# The MySQL  Server configuration file.
#
# For explanations see
# http://dev.mysql.com/doc/mysql/en/server-system-variables.html

[mysqld]
pid-file        = /var/run/mysqld/mysqld.pid
socket          = /var/run/mysqld/mysqld.sock
datadir         = /var/lib/mysql
#log-error      = /var/log/mysql/error.log
# By default we only accept connections from localhost
#bind-address   = 127.0.0.1
# Disabling symbolic-links is recommended to prevent assorted security risks
symbolic-links=0

# 服务在集群中的ID (全局唯一)
server-id=2

# 是否只读
read-only=1

character-set-client-handshake = FALSE
character-set-server = utf8mb4
collation-server = utf8mb4_unicode_ci
init_connect='SET NAMES utf8mb4'
sql_mode ='STRICT_TRANS_TABLES,NO_ZERO_IN_DATE,NO_ZERO_DATE,ERROR_FOR_DIVISION_BY_ZERO,NO_AUTO_CREATE_USER,NO_ENGINE_SUBSTITUTION'

[client]
default-character-set = utf8mb4

[mysql]
default-character-set = utf8mb4
后面的node2也是一样,修改一下id就好。
接着,我们就要去创建容器了
我是用docker-compose创建的
master的如下:
version: '3.1'
services:
    mysql:
        container_name: "dev-mysql-master"
        environment:
            MYSQL_ROOT_PASSWORD: "123456"
            MYSQL_USER: 'root'
            MYSQL_PASS: '123456'
        image: "mysql:5.7.30"
        restart: always
        ports:
            - 18929:3306
        volumes:
            - "./db:/var/lib/mysql"
            - "./conf-master:/etc/mysql"
            - "./log:/var/log/mysql"
node的如下:
version: '3.1'
services:
    mysql:
        container_name: "dev-mysql-node1"
        environment:
            MYSQL_ROOT_PASSWORD: "123456"
            MYSQL_USER: 'root'
            MYSQL_PASS: '123456'
        image: "mysql:5.7.30"
        restart: always
        ports:
            - 18930:3306
        volumes:
            - "./db:/var/lib/mysql"
            - "./conf-node1:/etc/mysql"
            - "./log:/var/log/mysql"
node2的改个名字
version: '3.1'
services:
    mysql:
        container_name: "dev-mysql-node2"
        environment:
            MYSQL_ROOT_PASSWORD: "123456"
            MYSQL_USER: 'root'
            MYSQL_PASS: '123456'
        image: "mysql:5.7.30"
        restart: always
        ports:
            - 18930:3306
        volumes:
            - "./db:/var/lib/mysql"
            - "./conf-node2:/etc/mysql"
            - "./log:/var/log/mysql"
把容器跑起来,进入到master里
docker-comopse up -d
进入到容器里
docker exec -it dev-mysql-master /bin/bash
登录mysql
mysql -uroot -pxxx
查看master的状态
show master status
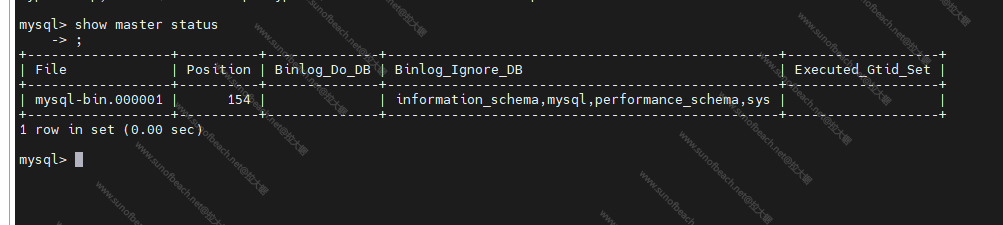
记住以的内容
启动节点1,然后进入到容器里,并且登录。
change master to master_host='192.168.0.121',master_user='root',master_password='123456',master_port=18929,master_log_file='mysql-bin.000001',master_log_pos=154,master_connect_retry=30;
看一下上面的参数
完事以后开始slave
start slave
接着就可以查看一下状态了
show slave status \G
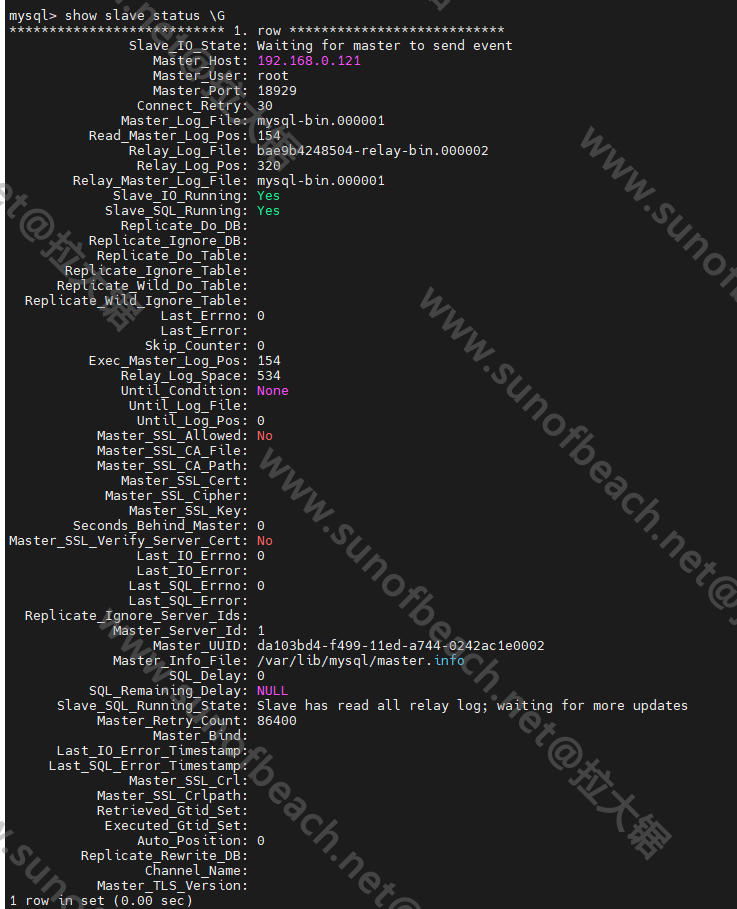
好,到这里,看到running为yes了,跑着了,可以去验证一下,另外一个节点也是如此添加进来。


