
最近写了个项目,其中有个功能是需要调用编译python的,写个笔记来记忆一下。 1. 安装和配置好python 安装python这里就不做笔记了百度大把,最好下载3.6的版本的python,高版本的在安装模块的时候会报错,记住安装的路径后面要用。 2.Androidstudio配置python环境 在Androidstudio点击File-》setting-》plugins下载python组件“Python Community Edition”安装好重启androidStudio环境就配置好啦  3.配置gradle 这里需要下载一个choquapy sdk 这个是要付钱的,不然打包后的app只能运行5分钟,有兴趣的可以玩一下。这里的下载不也单独在外面下载,直接配置一下gradle就可以了,很方便,废话不多说上代码。
buildscript {
    repositories {
        google()
        jcenter()
        maven { url "https://chaquo.com/maven" } //加这行
    }
    dependencies {
        classpath "com.android.tools.build:gradle:4.0.0"
        classpath "com.chaquo.python:gradle:8.0.0"//和这行
        // NOTE: Do not place your application dependencies here; they belong
        //        // in the individual module build.gradle files
    }
}
同步一下然后在app目录下的gradle,这里的armeabi-v7a是真机测试要用的,x86这个是模拟器的,根据自己的情况要用那个,两个一起也可以。
  defaultConfig {
      ...
        ndk {
            abiFilters "armeabi-v7a","x86"
        }
        python {
            buildPython "D:/python/python/python.exe"
        }
	...
    }
这里再加一行 apply plugin: 'com.chaquo.python' // Add this line  4.测试 最后是测试,项目用“project”打开找到python文件夹
 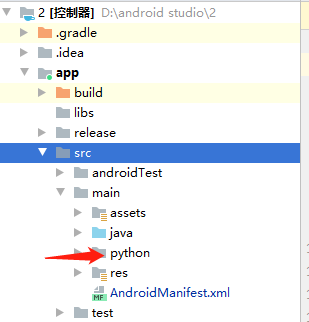 在里面创建一个python文件hello.py 内容是
def greet():
print("--- 我是python里的greet模块 ---")
然后就可以调用啦,调用页很简单,先初始化python
private void initPython() {
        if (!Python.isStarted()) {
            Python.start(new AndroidPlatform(this));
            Python py = Python.getInstance();
            py.getModule("sys").get("path").callAttr("append", getFilesDir().getAbsolutePath());
        }
    }
然后就可以使用了
Python.getInstance().getModule("hello").callAttr("greet");
运行logcat出现这个就测试成功了。