Android开发如何监听通知内容呢?
有些时候吧,我们需要知道通知内容,最简单的需求,我们要获取短信验证码,对吧。
以前的话我们可以通过监听内容提供者的变化,监听短信,那换一个思路呢?是不是可以监听通知呢?当然啦,如果禁止掉通知了,那就不有了。不过一般短信电话的通知是不禁止的。
而我需要做一个自己的通知栏。
官方改法,应该是把SystemUI里的通知栏移植一下。
我选择了监听的方式实现,毕竟系统都是我自己的,我想咋改就咋改。
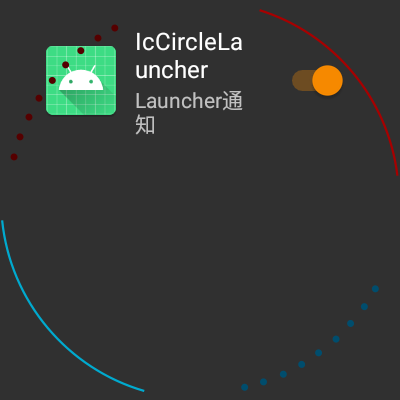
效果

显示通知内容!
实现步骤
- 检查是否有被通知的权限
- 监听通知
- 设置权限
- 默认给权限
编写服务
public class NotificationService extends NotificationListenerService {

    public static final String TAG = "NotificationService";
    //设置的地方要置空
    public static NotificationCallbackListener mCallback = null;


    public interface NotificationCallbackListener {

        void onNotificationAdd(StatusBarNotification sbn);

        void onNotificationRemove(StatusBarNotification sbn);

    }

    @Override
    public IBinder onBind(Intent intent) {
        return super.onBind(intent);
    }

    @Override
    public void onNotificationPosted(StatusBarNotification sbn) {
        Log.d(TAG, "onNotificationPosted mCallback == > " + mCallback);
        if (mCallback != null) {
            mCallback.onNotificationAdd(sbn);
        }
    }

    @Override
    public void onNotificationRemoved(StatusBarNotification sbn) {
        Log.d(TAG, "onNotificationRemoved mCallback == > " + mCallback);
        if (mCallback != null) {
            mCallback.onNotificationRemove(sbn);
        }
    }

    @Override
    public void onListenerConnected() {
        Log.d(TAG, "onListenerConnected...");
    }

    @Override
    public void onListenerDisconnected() {
        Log.d(TAG, "onListenerDisconnected...");
    }

}
注册服务
        <service
            android:name=".data.service.NotificationService"
            android:label="@string/service_name"
            android:permission="android.permission.BIND_NOTIFICATION_LISTENER_SERVICE">
            <intent-filter>
                <action android:name="android.service.notification.NotificationListenerService" />
            </intent-filter>
        </service>
NotificationManager
权限的获取,我们需要打开设置界面进行授权。比如说我这里是在Launcher的首页,那么我就在onCreate的时候去检查是否有权限,如果有则不打开,如果没有就去打开设置界面,授权。
mNm = (NotificationManager) getSystemService(Context.NOTIFICATION_SERVICE);
检查是否有被通知的权限
    public boolean isNotificationListenersEnabled() {
        String pkgName = getPackageName();
        final String flat = Settings.Secure.getString(getContentResolver(), "enabled_notification_listeners");
        if (!TextUtils.isEmpty(flat)) {
            final String[] names = flat.split(":");
            for (int i = 0; i < names.length; i++) {
                final ComponentName cn = ComponentName.unflattenFromString(names[i]);
                if (cn != null) {
                    if (TextUtils.equals(pkgName, cn.getPackageName())) {
                        return true;
                    }
                }
            }
        }
        return false;
    }
如果没有,那么就打开权限进行设置。
打开权限设置界面
    protected boolean openNotificationSettings() {
        try {
            Intent intent = new Intent("android.settings.ACTION_NOTIFICATION_LISTENER_SETTINGS");
            intent.addFlags(Intent.FLAG_ACTIVITY_NEW_TASK);
            startActivity(intent);
            return true;

        } catch (ActivityNotFoundException e) {
            try {
                Intent intent = new Intent();
                intent.addFlags(Intent.FLAG_ACTIVITY_NEW_TASK);
                ComponentName cn = new ComponentName("com.android.settings",
                        "com.android.settings.Settings$NotificationAccessSettingsActivity");
                intent.setComponent(cn);
                intent.putExtra(":settings:show_fragment",
                        "NotificationAccessSettings");
                startActivity(intent);
                return true;
            } catch (Exception e1) {
                e1.printStackTrace();
            }
            Toast.makeText(this, getString(R.string.not_support_notification_service), Toast.LENGTH_SHORT).show();
            e.printStackTrace();
            return false;
        }
    }
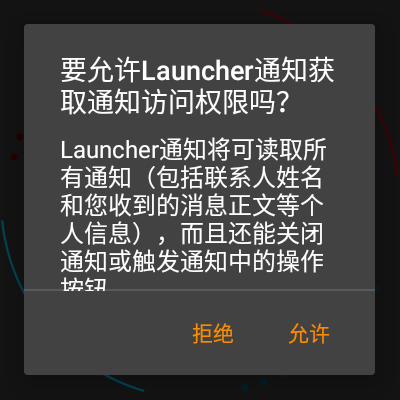
到这里,就授权了。
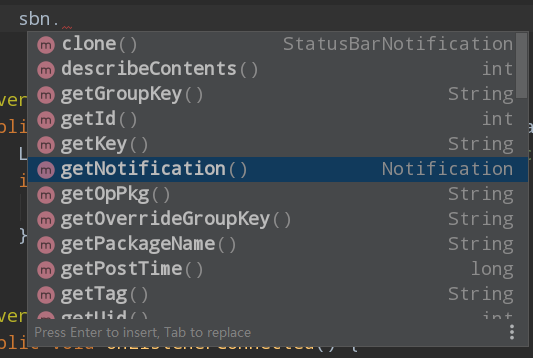
到这里就可以拿到通知了,具体的内容可以在回调方法里进行解析。
回调方法说明
  @Override
    public void onNotificationPosted(StatusBarNotification sbn) {
        Log.d(TAG, "onNotificationPosted mCallback == > " + mCallback);
        if (mCallback != null) {
            mCallback.onNotificationAdd(sbn);
        }
    }
有新通知
通知删除
    @Override
    public void onNotificationRemoved(StatusBarNotification sbn) {
        Log.d(TAG, "onNotificationRemoved mCallback == > " + mCallback);
        if (mCallback != null) {
            mCallback.onNotificationRemove(sbn);
        }
    }
服务链接状态回调方法
    @Override
    public void onListenerConnected() {
        Log.d(TAG, "onListenerConnected...");
    }

    @Override
    public void onListenerDisconnected() {
        Log.d(TAG, "onListenerDisconnected...");
    }
到此,基本上就可以获取到通知了,解析出来,然后显示在UI上即可。
但是,如果我们有系统源码,我们怎么可以让用户去设置这个权限呢?
直接让我们的应用拥有这个权限不就可以了吗?
直接让应用有获取通知的权限
思路:
前面我们通过打开权限授权界面,然后点击允许。那我们查找一下允许这个动作做了什么,不就可以了吗?
1. 定位授权界面代码
我们可以搜索“而且还能关闭通知或触发通知中的操作按钮”这个关键字
我们知道它在Settings里,所以可以进入到这个应用的源码里去搜索。
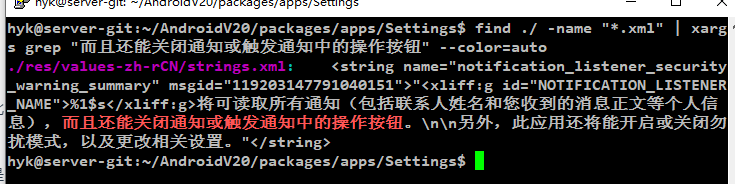
这样子就可以查出字符串了,接着,我们查这个字符串在哪里使用。

到这里,我们就知道在这两个类里使用了,有同学可能会疑问,xml里也可以使用呀,其实前面我们已经搜索了xml了,布局里没有。
还好,文件不多,打开看一下就知道了。
packages\apps\Settings\src\com\android\settings\notification\NotificationAccessConfirmationActivity.java
这个类里面,我们就可以找到这个允许对应的代码了。
 @Override
    protected void onCreate(@Nullable Bundle savedInstanceState) {
        super.onCreate(savedInstanceState);

        mNm = (NotificationManager) getSystemService(Context.NOTIFICATION_SERVICE);

        mComponentName = getIntent().getParcelableExtra(EXTRA_COMPONENT_NAME);
        mUserId = getIntent().getIntExtra(EXTRA_USER_ID, UserHandle.USER_NULL);
        String pkgTitle = getIntent().getStringExtra(EXTRA_PACKAGE_TITLE);

        AlertController.AlertParams p = new AlertController.AlertParams(this);
        p.mTitle = getString(
                R.string.notification_listener_security_warning_title,
                pkgTitle);
        p.mMessage = getString(
                R.string.notification_listener_security_warning_summary,
                pkgTitle);
        p.mPositiveButtonText = getString(R.string.allow);
        p.mPositiveButtonListener = (a, b) -> onAllow();
        p.mNegativeButtonText = getString(R.string.deny);
        p.mNegativeButtonListener = (a, b) -> cancel();
        AlertController
                .create(this, this, getWindow())
                .installContent(p);
    }
从这里就可以知道它创建了一个dialog
有一个允许和取消
我们关注允许,onAllow()这个方法
这个方法做了以下动作
  private void onAllow() {
        String requiredPermission = Manifest.permission.BIND_NOTIFICATION_LISTENER_SERVICE;
        try {
            ServiceInfo serviceInfo = getPackageManager().getServiceInfo(mComponentName, 0);
            if (!requiredPermission.equals(serviceInfo.permission)) {
                Slog.e(LOG_TAG,
                        "Service " + mComponentName + " lacks permission " + requiredPermission);
                return;
            }
        } catch (PackageManager.NameNotFoundException e) {
            Slog.e(LOG_TAG, "Failed to get service info for " + mComponentName, e);
            return;
        }

        mNm.setNotificationListenerAccessGranted(mComponentName, true);

        finish();
    }
重点就是这句了
mNm.setNotificationListenerAccessGranted(mComponentName, true);
mNm是这个
mNm = (NotificationManager) getSystemService(Context.NOTIFICATION_SERVICE);
mComponentName是ComponentName
那么也就是给我们前面的service的componentName设置一下就可以了。
最后这样修改就可以了
 public void saveEnabledServices() {
        String requiredPermission = Manifest.permission.BIND_NOTIFICATION_LISTENER_SERVICE;
        ComponentName mComponentName = new ComponentName("应用包名", "通知监听服务的全路径名称");
        try {
            ServiceInfo serviceInfo = getPackageManager().getServiceInfo(mComponentName, 0);
            if (!requiredPermission.equals(serviceInfo.permission)) {
                ICLogger.d("Service " + mComponentName + " lacks permission " + requiredPermission);
                return;
            }
        } catch (PackageManager.NameNotFoundException e) {
            ICLogger.d("Failed to get service info for " + mComponentName, e);
            return;
        }

        mNm.setNotificationListenerAccessGranted(mComponentName, true);
    }
okay到此,就讲完了监听系统的通知了。包括权限如何获取,默认就授权某个应用。