
首先这里的源码是sdk 29 的也就是Android 10.0的代码,其实和其他的版本区别不大
Inflater 方法的区别
View.inflate(this,R.layout.activity_main,null);
LayoutInflater.from(this).inflate(R.layout.activity_main,null,false);
View.inflate(this,R.layout.activity_main,null);方法里面也是调用LayoutInflater.from(this).inflate(),所以本质还是LayoutInflater.from(this).inflate()这个方法
从LayoutInflater.from()开始
LayoutInflater.from(this)
public static LayoutInflater from(Context context) {
    LayoutInflater LayoutInflater =
            (LayoutInflater) context.getSystemService(Context.LAYOUT_INFLATER_SERVICE);
    if (LayoutInflater == null) {
        throw new AssertionError("LayoutInflater not found.");
    }
    return LayoutInflater;
}
这里的getSystemService()是一个抽象方法,需要找到context的具体实现对象
这里context的实现类是ContextImpl类
看一下UML时序图 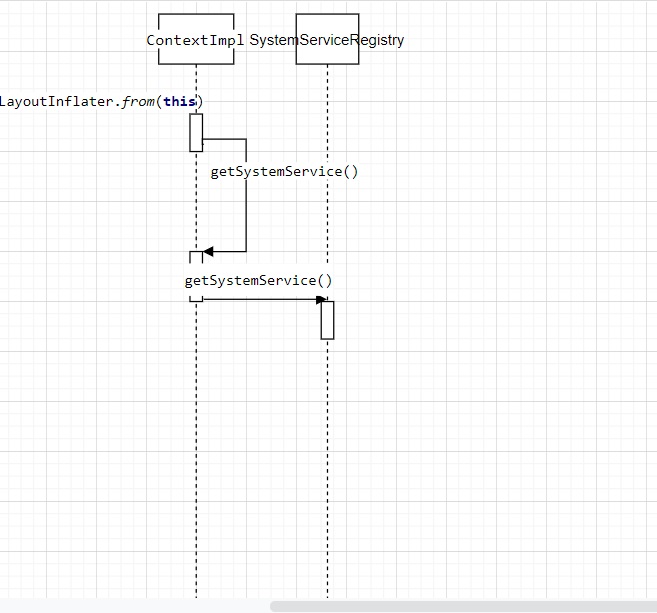
最终走到SystemServiceRegister的getSystemService()方法中
ServiceFetcher<?> fetcher = SYSTEM_SERVICE_FETCHERS.get(name);
SYSTEM_SERVICE_FETCHERS本质是一个ArrayMap,用来存储系统注册的服务
在这里要获取的是Context.LAYOUT_INFLATER_SERVICE这个服务,通过这个服务来获取View
inflate()
观看下面源码解析的时候先看一下时序图 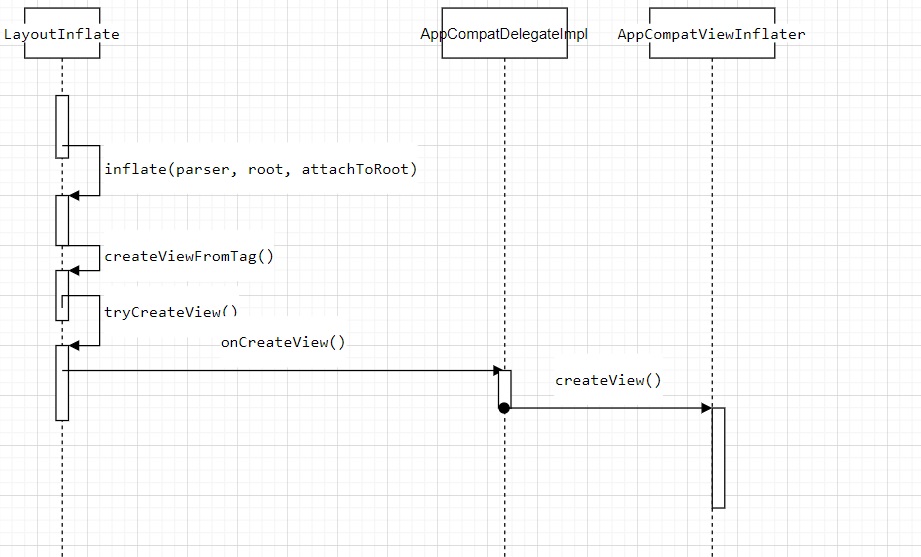
class LayoutInflater

public View inflate(@LayoutRes int resource, @Nullable ViewGroup root, boolean attachToRoot) {
    final Resources res = getContext().getResources();
    if (DEBUG) {
        Log.d(TAG, "INFLATING from resource: \"" + res.getResourceName(resource) + "\" ("
              + Integer.toHexString(resource) + ")");
    }

    View view = tryInflatePrecompiled(resource, res, root, attachToRoot);
    if (view != null) {
        return view;
    }
    XmlResourceParser parser = res.getLayout(resource);
    try {
        return inflate(parser, root, attachToRoot);
    } finally {
        parser.close();
    }
}
XmlResourceParser parser = res.getLayout(resource)这个是解析器,用于解析xml
关键在inflate(parser, root, attachToRoot);
tryCreateView()
class LayoutInflater

public final View tryCreateView(@Nullable View parent, @NonNull String name,
    @NonNull Context context,
    @NonNull AttributeSet attrs) {
    if (name.equals(TAG_1995)) {
        // Let's party like it's 1995!
        return new BlinkLayout(context, attrs);
    }

    View view;
    if (mFactory2 != null) {
        view = mFactory2.onCreateView(parent, name, context, attrs);
    } else if (mFactory != null) {
        view = mFactory.onCreateView(name, context, attrs);
    } else {
        view = null;
    }

    if (view == null && mPrivateFactory != null) {
        view = mPrivateFactory.onCreateView(parent, name, context, attrs);
    }

    return view;
}
这里会判断mFactory2、mFactory、mPrivateFactory是否为空,不为空就调用相应的onCreateView()方法。
回到createViewFromTag()方法观看下面,
View createViewFromTag(View parent, String name, Context context, AttributeSet attrs,
       ....

        try {
            View view = tryCreateView(parent, name, context, attrs);
            if (view == null) {
                final Object lastContext = mConstructorArgs[0];
                mConstructorArgs[0] = context;
                try {
                    if (-1 == name.indexOf('.')) {
                        view = onCreateView(context, parent, name, attrs);
                    } else {
                        view = createView(context, name, null, attrs);
                    }
                } finally {
                    mConstructorArgs[0] = lastContext;
                }
            }

            return view;
            ....
    }
当mFactory2、mFactory、mPrivateFactory为空,那么view也是null,那么会用自己的onCreateView()方法,注意这里的if(-1 == name.indexOf('.'))
name是使用xml解析工具解析xml文件获取到的属性,这个是判断有没有自己定义的控件如com.example.TestText这种自己定义的控件,那么就调用相应的创建方法。
好,回到上面tryCreateView()方法中,这个mFactory什么时候被赋值,在哪里赋值?
经过一番最终和查找,发现在AppCompatActivity中的OnCreate() 中有一个delegate.installViewFactory();方法,点进去就是在 AppCompatDelegateImpl类中 installViewFactory() 方法中将Factory赋值
赋值Factory
class AppCompatDelegateImpl

public void installViewFactory() {
    LayoutInflater layoutInflater = LayoutInflater.from(mContext);
    if (layoutInflater.getFactory() == null) {
        LayoutInflaterCompat.setFactory2(layoutInflater, this);
    } else {
        if (!(layoutInflater.getFactory2() instanceof AppCompatDelegateImpl)) {
            Log.i(TAG, "The Activity's LayoutInflater already has a Factory installed"
                    + " so we can not install AppCompat's");
        }
    }
}
LayoutInflaterCompat.setFactory2(layoutInflater, this);将自己传入进去,那么LayoutInflate类走的onCreateView()方法就是LayoutInflaterCompat.onCreateView() 继续往下走就是走的**AppCompatViewInflater.onCreate()**方法,然后我们可以看到
class AppCompatViewInflater

final View createView(View parent, final String name, @NonNull Context context,
        @NonNull AttributeSet attrs, boolean inheritContext,
        boolean readAndroidTheme, boolean readAppTheme, boolean wrapContext) {
    final Context originalContext = context;

    // We can emulate Lollipop's android:theme attribute propagating down the view hierarchy
    // by using the parent's context
    if (inheritContext && parent != null) {
        context = parent.getContext();
    }
    if (readAndroidTheme || readAppTheme) {
        // We then apply the theme on the context, if specified
        context = themifyContext(context, attrs, readAndroidTheme, readAppTheme);
    }
    if (wrapContext) {
        context = TintContextWrapper.wrap(context);
    }

    View view = null;

    // We need to 'inject' our tint aware Views in place of the standard framework versions
    switch (name) {
        case "TextView":
            view = createTextView(context, attrs);
            verifyNotNull(view, name);
            break;
        case "ImageView":
            view = createImageView(context, attrs);
            verifyNotNull(view, name);
            break;
        case "Button":
            view = createButton(context, attrs);
            verifyNotNull(view, name);
            break;
            ....
        default:
            // The fallback that allows extending class to take over view inflation
            // for other tags. Note that we don't check that the result is not-null.
            // That allows the custom inflater path to fall back on the default one
            // later in this method.
            view = createView(context, name, attrs);
    }

    if (view == null && originalContext != context) {
        // If the original context does not equal our themed context, then we need to manually
        // inflate it using the name so that android:theme takes effect.
        view = createViewFromTag(context, name, attrs);
    }

    if (view != null) {
        // If we have created a view, check its android:onClick
        checkOnClickListener(view, attrs);
    }

    return view;
}
这里会看一下解析出来的属性有没有Button、TextView、ImageView等等,有的话就会为我们创建相应的View, view = createViewFromTag(context, name, attrs);这一行是用来处理那一些自定义View,通过反射将对象new出来。跟上面一样。
这样AppCompatViewInflater就对View的创建进行了拦截。这个就是View的Inflater加载大概过程。
自己拦截View的创建
看了上面的源码,我们可以尝试一下自己来进行拦截View的创建,尝试拦截View将所有Button变成TextView
public class BaseActivity extends AppCompatActivity {

    @Override
    protected void onCreate(@Nullable Bundle savedInstanceState) {
        LayoutInflater layoutInflater = LayoutInflater.from(this);
        LayoutInflaterCompat.setFactory(layoutInflater,new LayoutInflaterFactory(){

            @Override
            public View onCreateView(View parent, String name, Context context, AttributeSet attrs) {
                Log.d("TAG","拦截view的创建");
                if(name.equals("Button")){
                    TextView tv = new TextView(BaseActivity.this);
                    tv.setText("拦截");
                    return tv;
                }
                return null;
            }
        });
        super.onCreate(savedInstanceState);
        ....
    }
}


