

发布 Jar 包到 Maven 中央仓库
当自己创建了一个开源库,想发布到maven中供其余开发者使用,此时需要先将jar包上传。
准备
-
参考:https://blog.csdn.net/ttzommed/article/details/114697533 (大部分正确,有些地方需要更新)
-
一个编写完成的maven项目
-
安装gpg4win。
下载地址是https://www.gpg4win.org/download.html 。在4.0开始,已经有了图形化界面。一路点下一步。
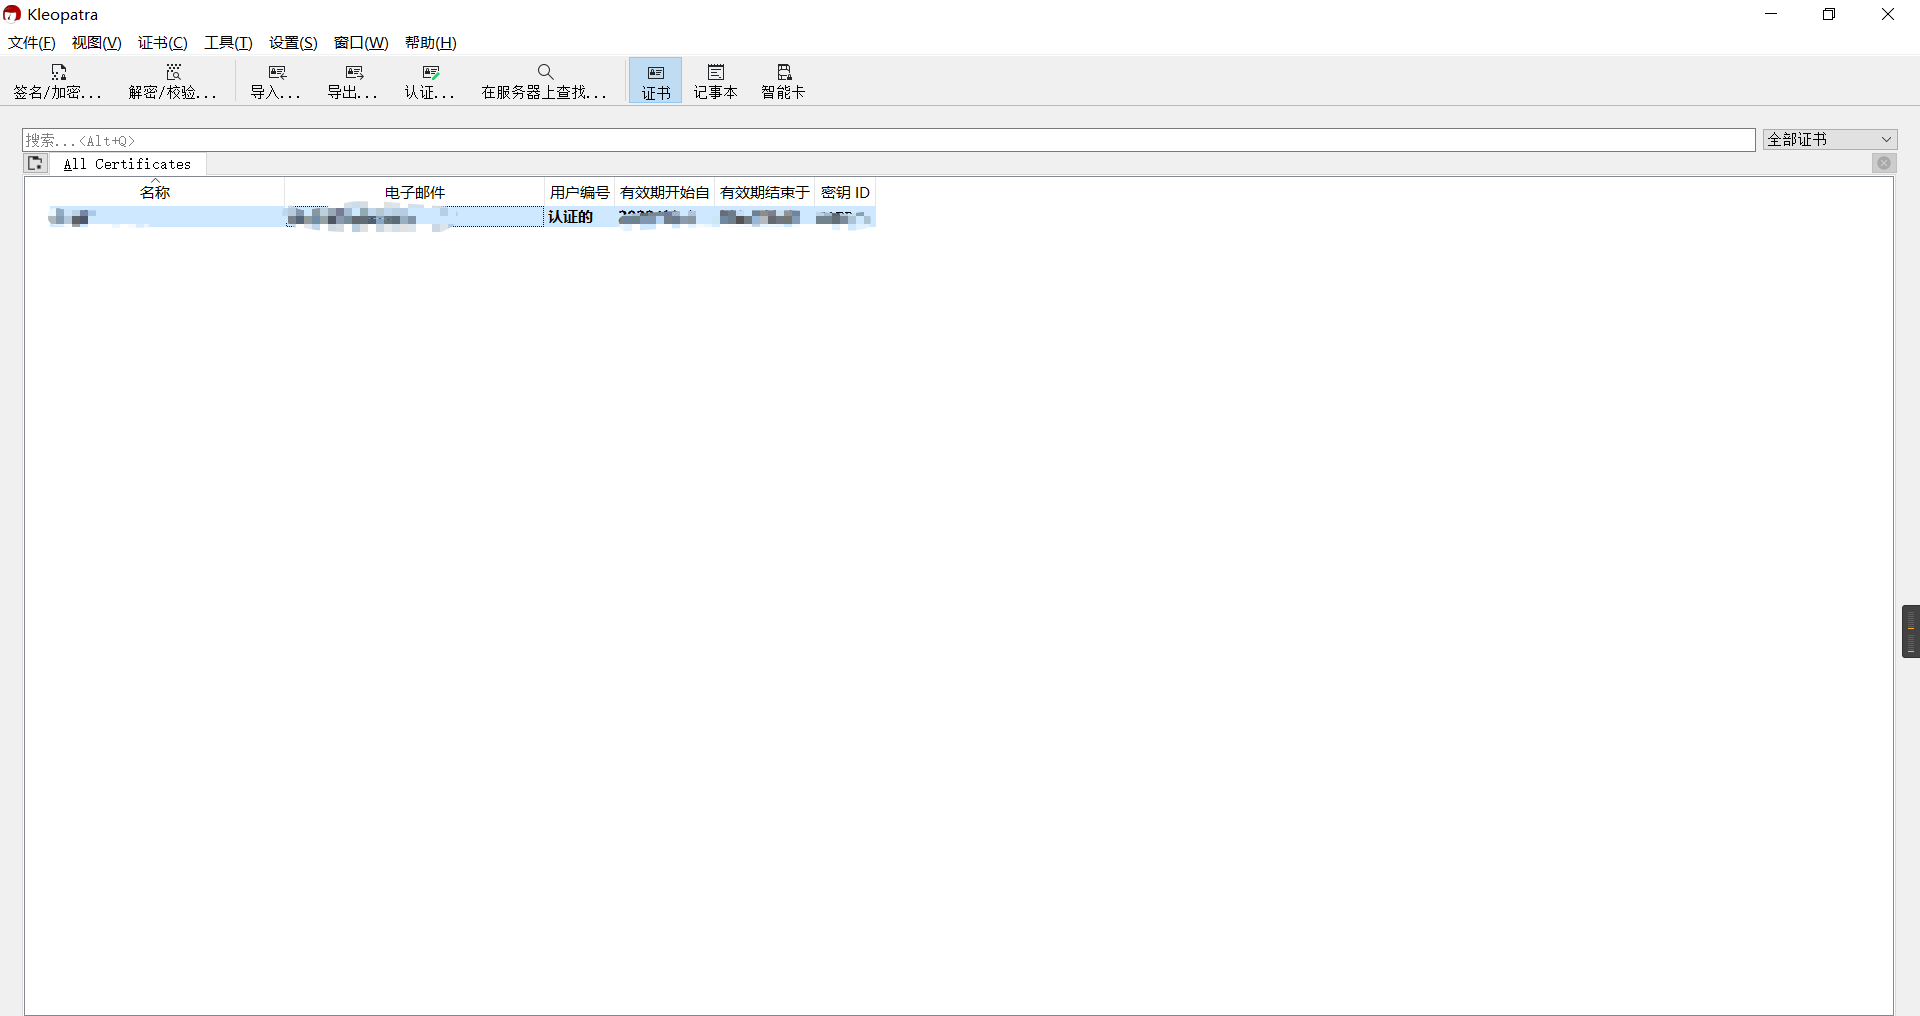
安装完成后界面如下:
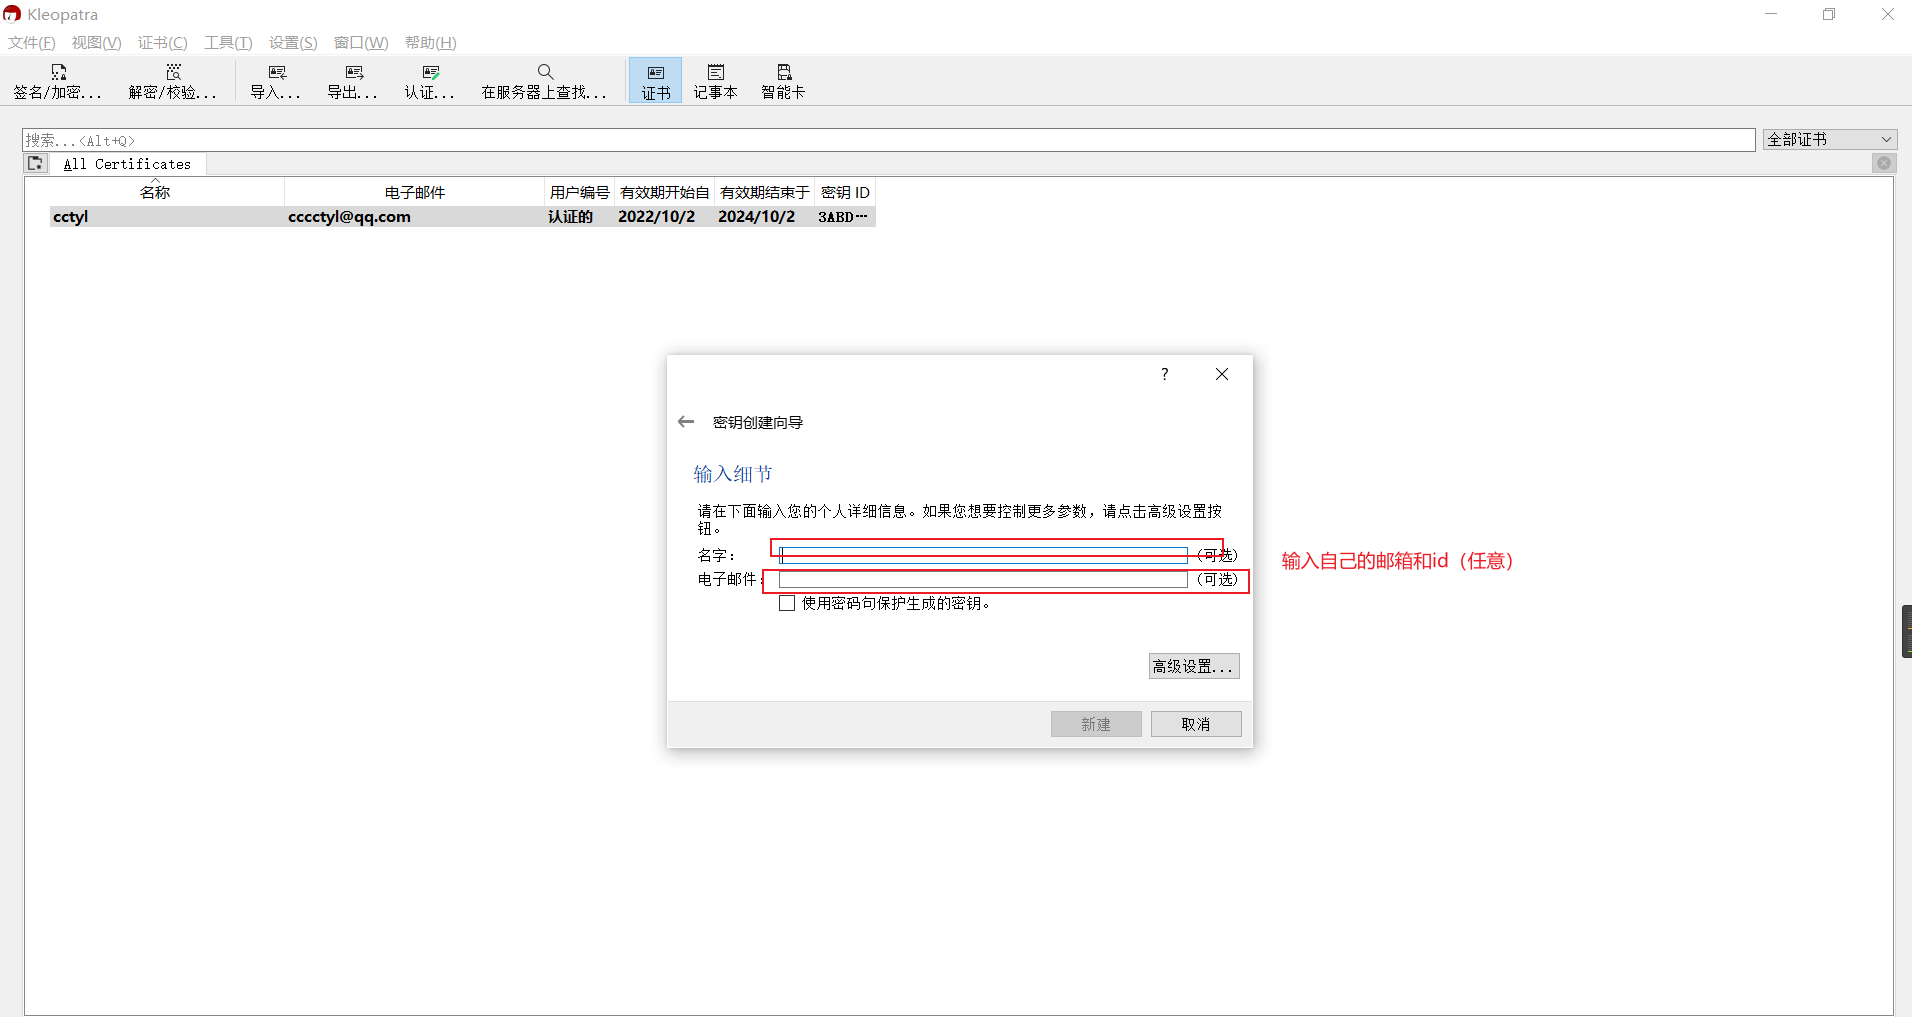
点击左上角,新建秘钥对。
新建完成后: 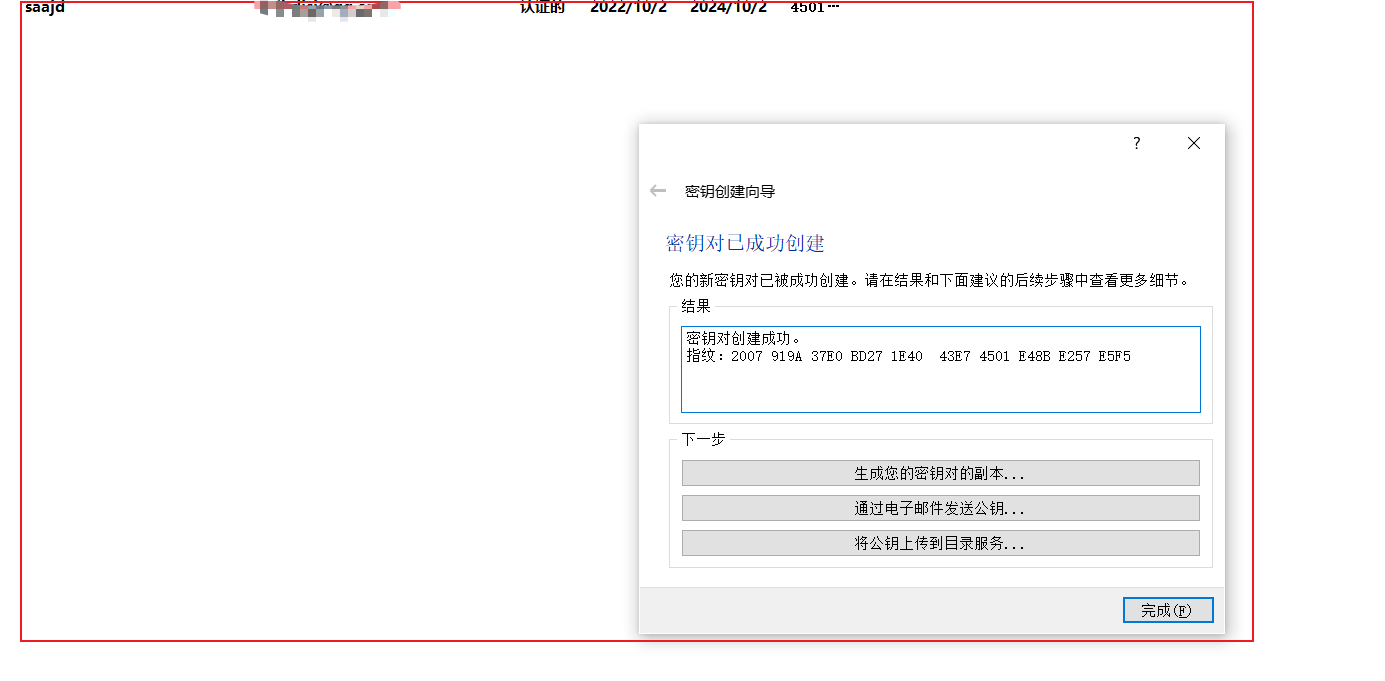
会提供一个指纹,记住它,后续会使用到。
然后点击将 公钥上传到目录服务。
这样就基本完成。
注册sonatype账号
我们没法直接把jar发布到maven中央仓库,需要先上传到sonatype,之后才能同步到中央仓库中。
注册地址:https://issues.sonatype.org/secure/Signup!default.jspa
访问时很流畅,没有遇到网络不通的情况。
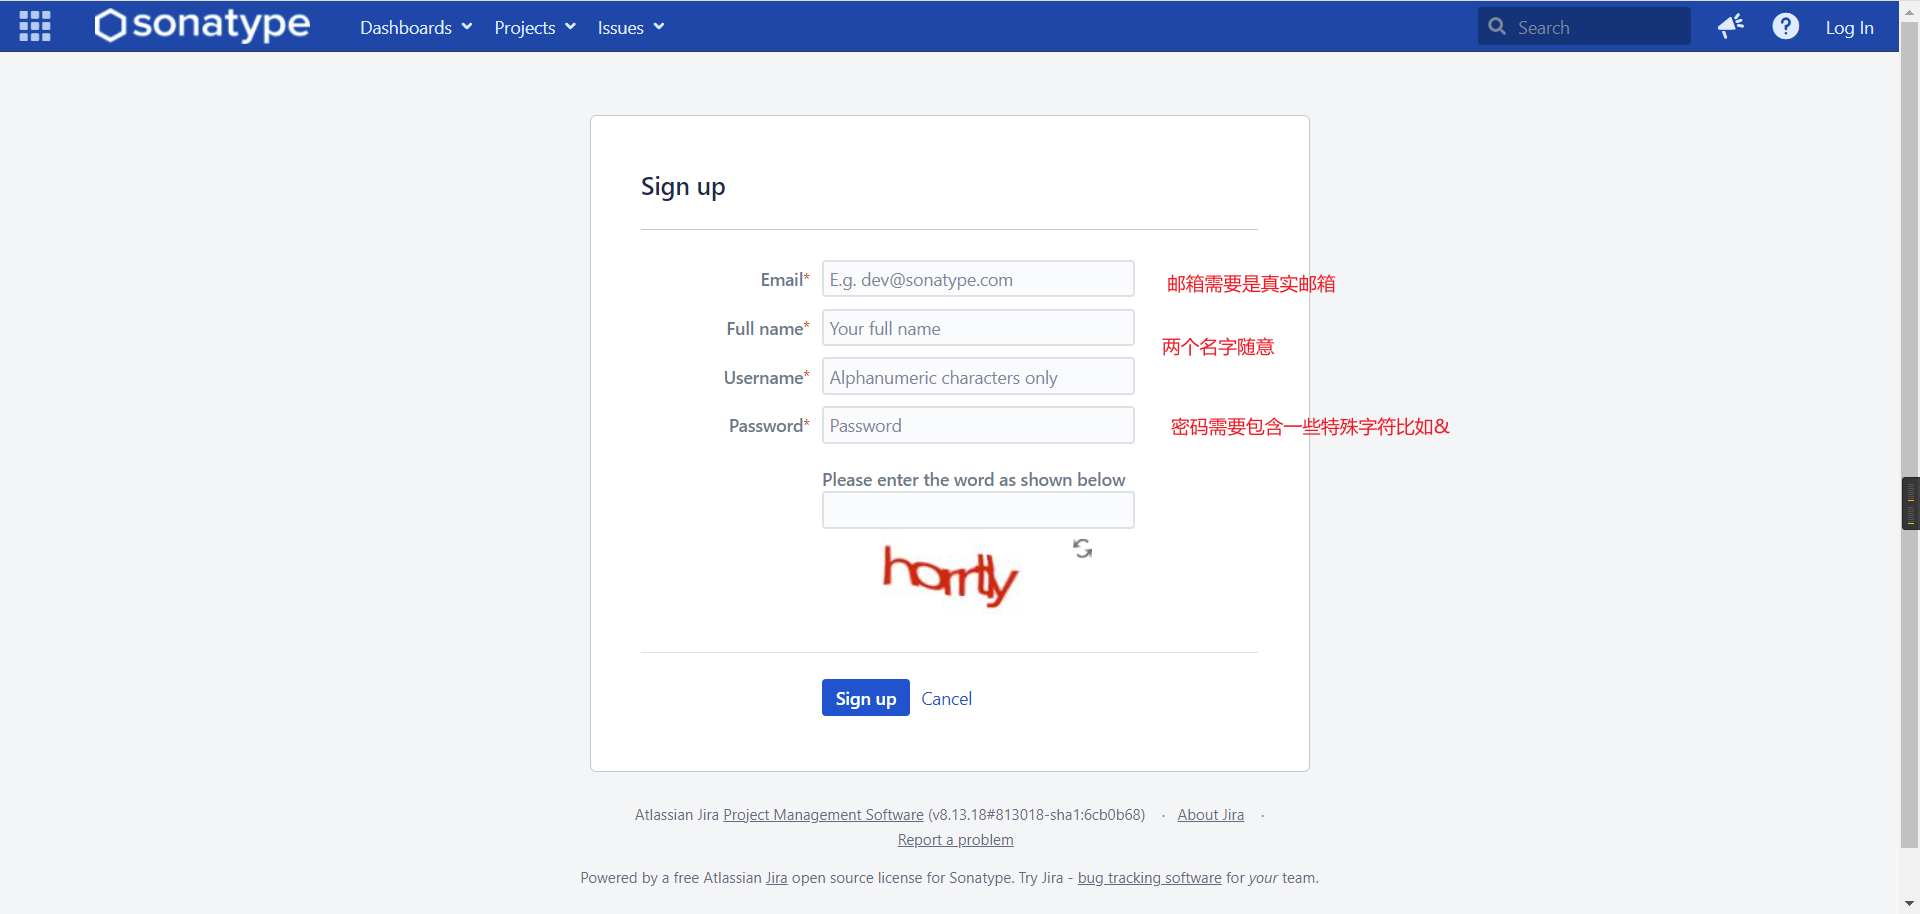
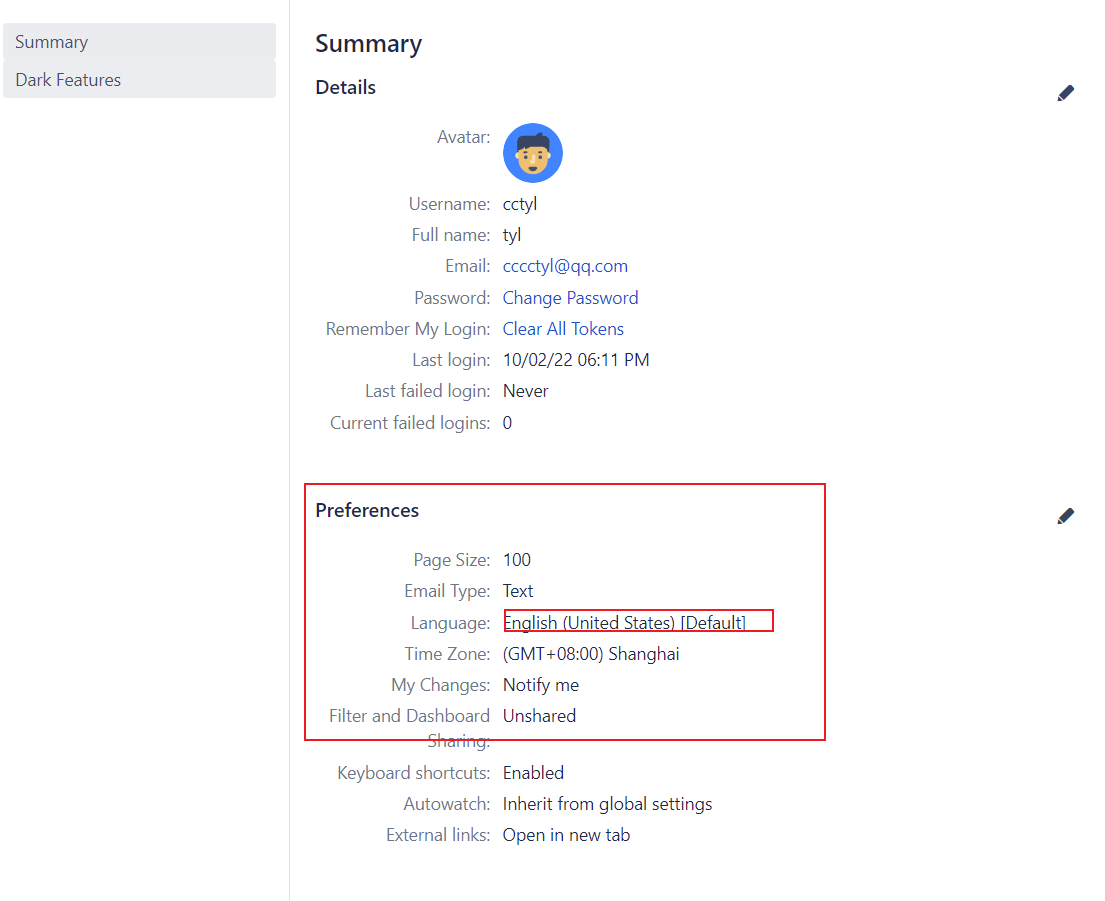
此时可以到https://issues.sonatype.org/secure/ViewProfile.jspa ,个人信息栏,把语言改成中文(不完全的中文)
创建ISSUS
就是一个工单,让别人审核你的项目。
步骤如下:
进入https://issues.sonatype.org/secure/Dashboard.jspa
 点击新建,
点击新建,

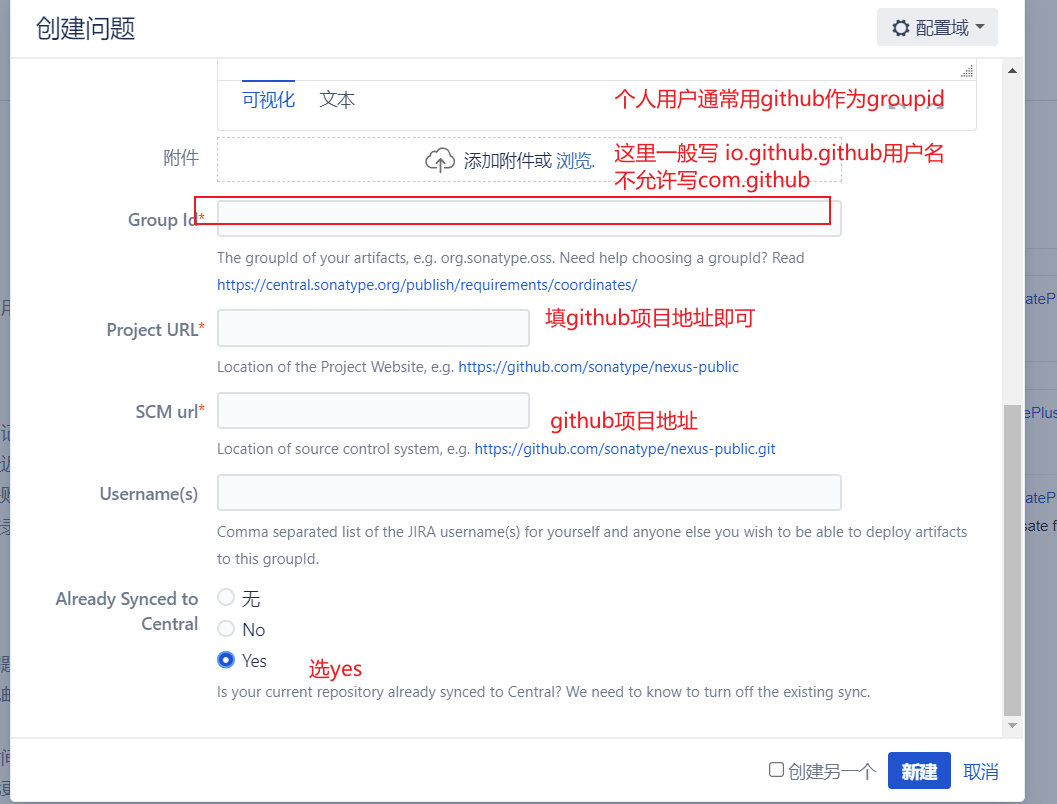
注意看groupId。自己项目中pom文件的groupId 最好与这个相同。
点击新建,这样工单就创建完成。
在问题栏下,可以找到自己创建的工单:

接下来,等个一两分钟,会有机器人进行回复
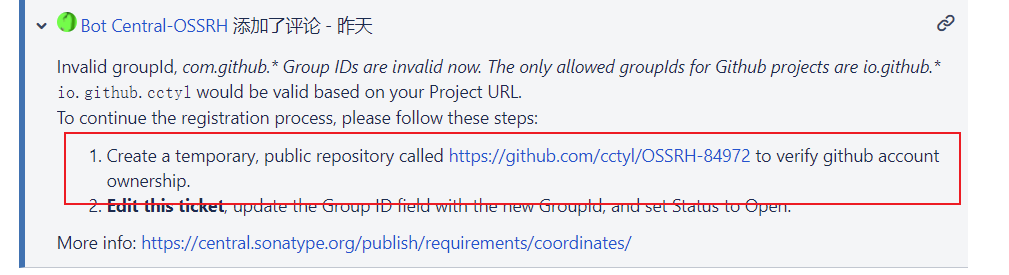
 首先第一次回复会告诉你,你的配置有什么问题,需要怎么更改。
另外,我们使用的是github的地址作为groupId,所以它通常会要求我们到github的账号上,创建一个公开仓库,来验证这个账号是你拥有的。
创建完以后,此时注意。你需要回到工单页面,点击回复,这样机器人才会进一步审核。
 顺利的话,几分钟就会有机器人过来审核。
审核通过后,通常你会受到一封相关邮件,或者在工单下会有机器人回复:

此时表示审核完成。可以开始打包发布
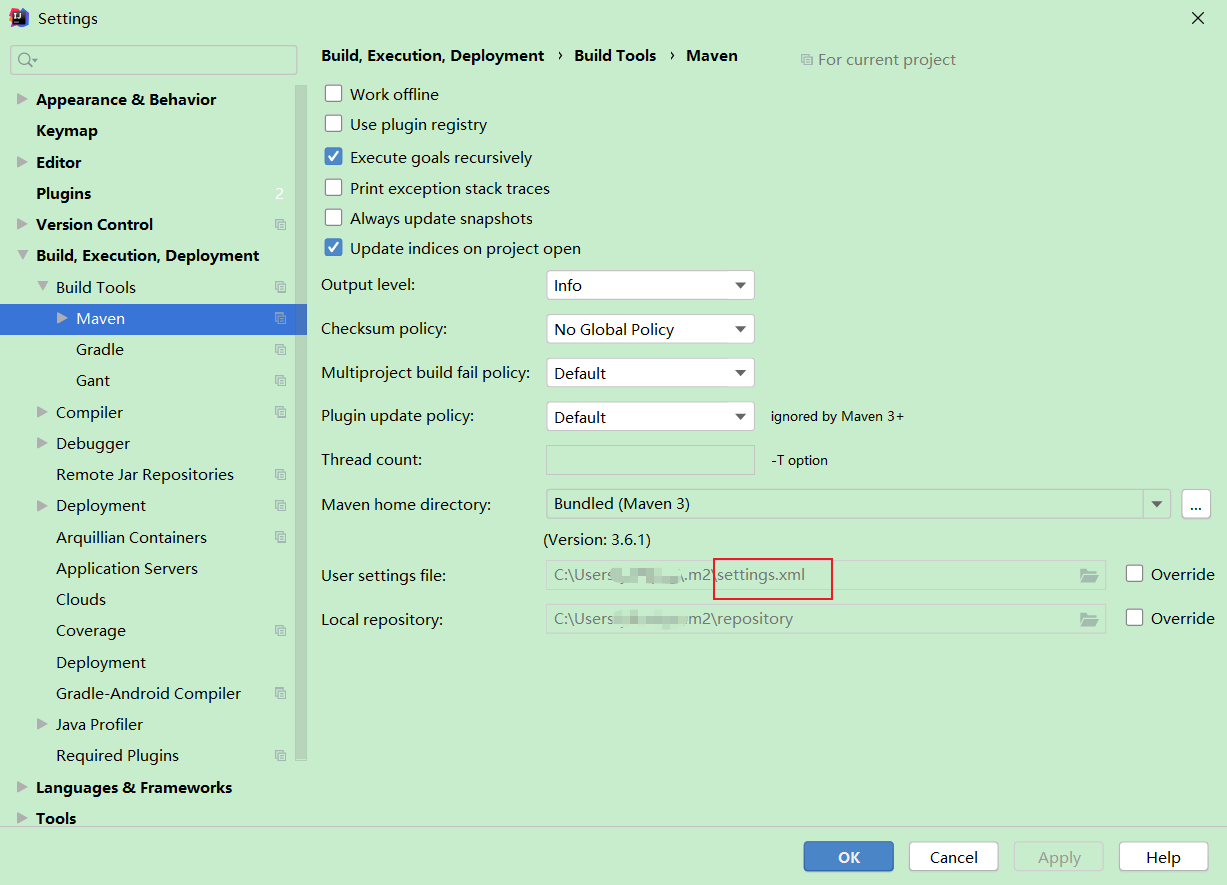
修改Maven settings.xml
这个就是maven的主配置文件。看你的maven怎么配置。我此时使用的是idea默认的maven,所以就在C:\Users\用户名\.m2\settings.xml
需要添加两个标签。
首先是profile标签,在 <profiles> 这个父标签下,添加:
	<profile>
		 <!-- id 与 pom.xml 的 maven-gpg-plugin 插件中的 id 对应-->
		<id>ossrh</id>
		 <activation>
		<activeByDefault>true</activeByDefault>
		 </activation>
		 <properties>
		<gpg.executable>gpg</gpg.executable>
		<gpg.passphrase>这个就是最开始创建的gpg的指纹</gpg.passphrase>
		 </properties>
		</profile>
	</profiles>
然后是server标签,在 <servers> 父标签下添加如下:
	<server>
		<id>sonatype-snapshots</id>
		<username>sonatype账号</username>
		<password><![CDATA[sonatype密码]]></password>
		</server>
	<server>
		<id>sonatype-release</id>
		<username>sonatype账号</username>
		<password><![CDATA[sonatype密码]]></password>
	</server>
因为前面说过,sonatype密码会要求包含特殊字符,所以用cdata来包裹防止报错。
到这里,settings.xml 就修改完成了
修改项目pom.xml
在项目原有的配置的情况下,我们额外添加一些内容,结构如下:
<?xml version="1.0" encoding="UTF-8"?>
<project xmlns="http://maven.apache.org/POM/4.0.0"
         xmlns:xsi="http://www.w3.org/2001/XMLSchema-instance"
         xsi:schemaLocation="http://maven.apache.org/POM/4.0.0 http://maven.apache.org/xsd/maven-4.0.0.xsd">
    <modelVersion>4.0.0</modelVersion>

    <url>https://github.com/cctyl/jdbcTemplatePlus</url>


    <scm>
        <!--你的github地址-->
        <url>https://github.com/cctyl/jdbcTemplatePlus</url>

        <connection>scm:git:https://github.com/cctyl/jdbcTemplatePlus.git</connection>
        <developerConnection>scm:git:https://github.com/cctyl/jdbcTemplatePlus.git</developerConnection>
        <tag>HEAD</tag>
    </scm>

    <!--一些开发者信息,照着改即可-->
    <developers>
        <developer>
            <id>cctyl</id>
            <name>cctyl</name>
            <email>cccctyl@qq.com</email>
            <url>https://github.com/cctyl</url>
            <timezone>+8</timezone>
        </developer>
    </developers>
    <!--开源协议,这个大伙自行选择,或者直接用-->
    <licenses>
        <license>
            <name>The Apache Software License, Version 2.0</name>
            <url>http://www.apache.org/licenses/LICENSE-2.0.txt</url>
        </license>
    </licenses>


    <groupId>io.github.cctyl</groupId>
    <artifactId>jdbcTemplatePlus</artifactId>
    <version>1.0</version>

    <!--注意,这两个标签: name description必须有-->
    <name>jdbcTemplatePlus</name>
    <description>jdbcTemplate is packaged to compensate for the lack of flexibility in fully automated frameworks such as JPA</description>
    <properties>
        <java.version>1.8</java.version>
        <!--项目编译JDK版本-->
        <maven.compiler.source>8</maven.compiler.source>
        <maven.compiler.target>8</maven.compiler.target>
        <!--项目编码-->
        <project.build.sourceEncoding>UTF-8</project.build.sourceEncoding>
        <!--插件版本-->
        <maven-compiler-plugin.version>3.8.1</maven-compiler-plugin.version>
        <maven-release-plugin.version>3.0.0-M1</maven-release-plugin.version>
        <maven-source-plugin.version>3.2.1</maven-source-plugin.version>
        <maven-javadoc-plugin.version>3.2.0</maven-javadoc-plugin.version>
        <nexus-staging-maven-plugin.version>1.6.8</nexus-staging-maven-plugin.version>
        <maven-gpg-plugin.version>1.6</maven-gpg-plugin.version>
        <maven-deploy-plugin.version>3.0.0-M1</maven-deploy-plugin.version>
    </properties>
    <dependencyManagement>
        <!-- 根据自己项目依赖需要进行编写,或者不写 -->
    </dependencyManagement>

    <dependencies>

        <!--此处省略...-->

    </dependencies>

    <!-- 对照自己项目,进行追加 -->
    <build>
        <plugins>
            <plugin>
                <groupId>org.apache.maven.plugins</groupId>
                <artifactId>maven-compiler-plugin</artifactId>
                <configuration>
                    <source>8</source>
                    <target>8</target>
                </configuration>
            </plugin>
            <!-- Source -->
            <plugin>
                <groupId>org.apache.maven.plugins</groupId>
                <artifactId>maven-source-plugin</artifactId>
                <version>${maven-source-plugin.version}</version>
                <executions>
                    <execution>
                        <id>attach-sources</id>
                        <phase>package</phase>
                        <goals>
                            <goal>jar-no-fork</goal>
                        </goals>
                    </execution>
                </executions>
            </plugin>
            <!-- Javadoc -->
            <plugin>
                <groupId>org.apache.maven.plugins</groupId>
                <artifactId>maven-javadoc-plugin</artifactId>
                <version>${maven-javadoc-plugin.version}</version>
                <configuration>
                    <show>package</show>
                    <tags>
                        <tag>
                            <name>date</name>
                        </tag>
                    </tags>
                </configuration>
                <executions>
                    <execution>
                        <id>attach-javadocs</id>
                        <phase>package</phase>
                        <goals>
                            <goal>jar</goal>
                        </goals>
                        <configuration>
                            <doclint>none</doclint>
                        </configuration>
                    </execution>
                </executions>
            </plugin>

            <!-- Gpg Signature -->
            <plugin>
                <groupId>org.apache.maven.plugins</groupId>
                <artifactId>maven-gpg-plugin</artifactId>
                <version>${maven-gpg-plugin.version}</version>
                <executions>
                    <execution>
                        <!-- id 与 setting.xml 的 gpg 配置中的 id 对应-->
                        <id>ossrh</id>
                        <phase>verify</phase>
                        <goals>
                            <goal>sign</goal>
                        </goals>
                    </execution>
                </executions>
            </plugin>
            <plugin>
                <groupId>org.sonatype.plugins</groupId>
                <artifactId>nexus-staging-maven-plugin</artifactId>
                <version>${nexus-staging-maven-plugin.version}</version>
                <extensions>true</extensions>
                <configuration>
                    <!-- 与 setting.xml 的 server 配置中的 sonatype-release 对应-->
                    <serverId>sonatype-release</serverId>
                    <nexusUrl>https://s01.oss.sonatype.org/</nexusUrl>
                    <autoReleaseAfterClose>true</autoReleaseAfterClose>
                </configuration>
            </plugin>


        </plugins>
    </build>

    <!-- 这里的两个 snapshotRepository ,中间id要与settings.xml 中server标签的id 相对应
        url 可以在这个页面找到具体的 release 和 snapshots 对应的地址
    -->
    <distributionManagement>
        <snapshotRepository>
            <id>sonatype-snapshots</id>
            <url>https://s01.oss.sonatype.org/content/repositories/snapshots</url>
        </snapshotRepository>
        <repository>
            <id>sonatype-release</id>
            <url>https://s01.oss.sonatype.org/service/local/staging/deploy/maven2/</url>
        </repository>
    </distributionManagement>


    <!--  根据自己项目配置,把这些补充上去就行 -->
    <profiles>
        <!--release-->
        <profile>
            <id>release</id>
            <build>
                <plugins>
                    <plugin>
                        <groupId>org.apache.maven.plugins</groupId>
                        <artifactId>maven-deploy-plugin</artifactId>
                        <version>${maven-deploy-plugin.version}</version>
                    </plugin>
                    <!-- Source -->
                    <plugin>
                        <groupId>org.apache.maven.plugins</groupId>
                        <artifactId>maven-source-plugin</artifactId>
                        <version>${maven-source-plugin.version}</version>
                        <executions>
                            <execution>
                                <id>attach-sources</id>
                                <phase>package</phase>
                                <goals>
                                    <goal>jar-no-fork</goal>
                                </goals>
                            </execution>
                        </executions>
                    </plugin>
                    <!-- Javadoc -->
                    <plugin>
                        <groupId>org.apache.maven.plugins</groupId>
                        <artifactId>maven-javadoc-plugin</artifactId>
                        <version>${maven-javadoc-plugin.version}</version>
                        <configuration>
                            <show>package</show>
                            <tags>
                                <tag>
                                    <name>date</name>
                                </tag>
                            </tags>
                        </configuration>
                        <executions>
                            <execution>
                                <id>attach-javadocs</id>
                                <phase>package</phase>
                                <goals>
                                    <goal>jar</goal>
                                </goals>
                                <configuration>
                                    <doclint>none</doclint>
                                </configuration>
                            </execution>
                        </executions>
                    </plugin>
                    <!-- Gpg Signature -->
                    <plugin>
                        <groupId>org.apache.maven.plugins</groupId>
                        <artifactId>maven-gpg-plugin</artifactId>
                        <version>${maven-gpg-plugin.version}</version>
                        <executions>
                            <execution>
                                <id>ossrh</id>
                                <phase>verify</phase>
                                <goals>
                                    <goal>sign</goal>
                                </goals>
                            </execution>
                        </executions>
                    </plugin>
                    <plugin>
                        <groupId>org.sonatype.plugins</groupId>
                        <artifactId>nexus-staging-maven-plugin</artifactId>
                        <version>${nexus-staging-maven-plugin.version}</version>
                        <extensions>true</extensions>
                        <configuration>
                            <serverId>sonatype-release</serverId>
                            <nexusUrl>https://s01.oss.sonatype.org/</nexusUrl>
                            <autoReleaseAfterClose>true</autoReleaseAfterClose>
                        </configuration>
                    </plugin>
                </plugins>
            </build>

            <!--与上面类似-->
            <distributionManagement>
                <snapshotRepository>
                    <id>sonatype-snapshots</id>
                    <url>https://s01.oss.sonatype.org/content/repositories/snapshots</url>
                </snapshotRepository>
                <repository>
                    <id>sonatype-release</id>
                    <url>https://s01.oss.sonatype.org/service/local/staging/deploy/maven2/</url>
                </repository>
            </distributionManagement>
        </profile>
    </profiles>
</project>
打包上传
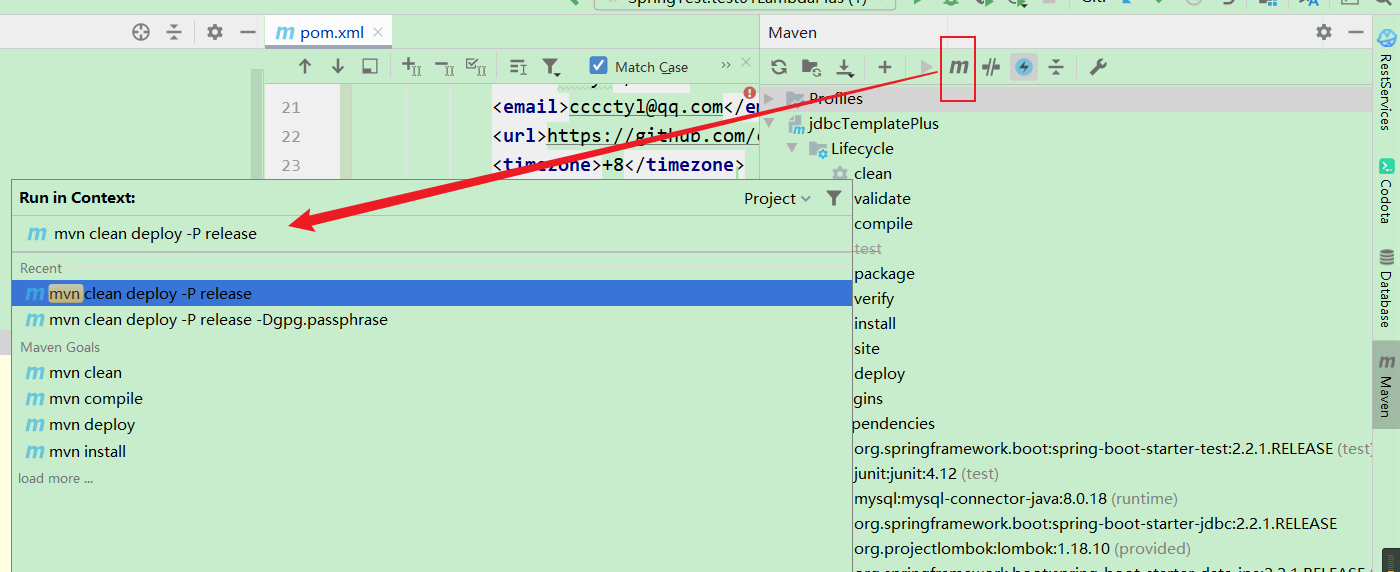
此时进入命令行,输入mvn clean deploy -P release 。这里mvn就是调用maven,确保调用的maven使用的配置文件是之前修改的settings.xml。
如果是使用idea,还可以直接点右上角进行运行
运行完成的提示如下:

此时,应该会受到sonatype的一封邮件,上去查看工单应该会发现状态变成了 已解决

测试
此时随便创建一个maven项目,引入dependency。groupId 就是之前填写过的,版本也是自己写好的。引入后,看是否能从maven仓库下载依赖,如果能成功下载,说明上传成功了


