

Android网络编程Retrofit
本文为Android开发网络编程系列课程内容,更多内容请查看课程
我们先是学习了http协议,然后使用java的api去请求数据,接着我们觉得麻烦,又学了一个okhttp,只管请求参数跟请求结果,不用处理线程,也不用处理请求头等复杂的内容。
前辈们感觉还不够简单,于是又整了一个Retrofit。学过后台的同学就知道了,以前配置很复杂。有了注解驱动开发以后,很多配置通过注解的方式就可以完成了。简单了很多。
而Retrofit是一款基于注解把http api转成接口,使用起来更加简单。
接下来,我们就看看怎么使用吧!
权限
权限问题自行处理,些系列里前面的课程里介绍高版本如何配置http的安全访问配置以及网络权限。
服务器接口
或者使用网站的商城API
文档和代码
文档地址:
添加依赖
版本在release里看就好了
implementation 'com.squareup.retrofit2:retrofit:(insert latest version)'
目前最新的版本是:parent-2.6.1
所以我这里的依赖就用
implementation 'com.squareup.retrofit2:retrofit:parent-2.6.1
另外,我们要把结果转成对象,这个时候需要加一些转换器
implementation 'com.squareup.retrofit2:converter-gson:2.6.2'
当然啦,有多种。在前面的官方文档中有提到
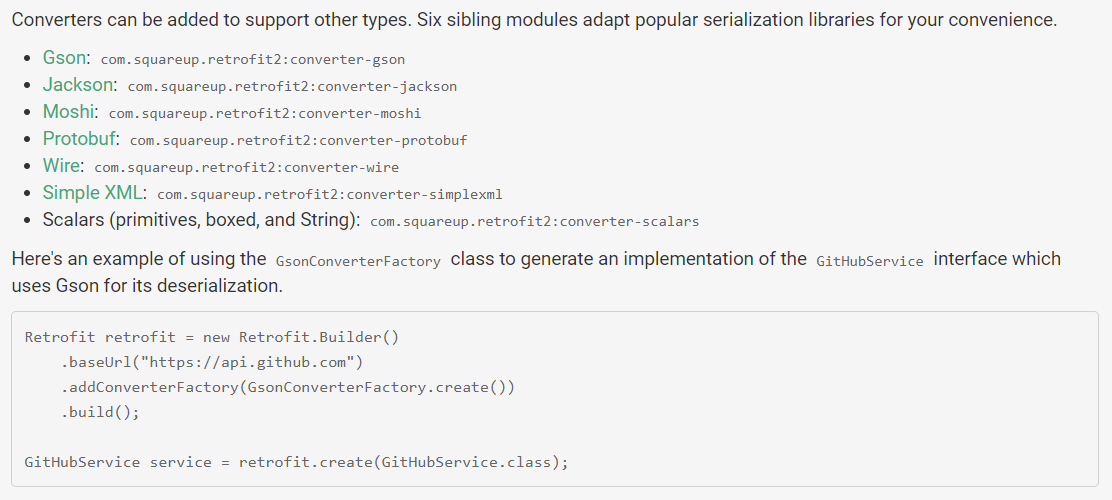
可以转xml的数据,可以转Json的数据。我们的数据格式是json,可以用Gson,也可以用Jackson
版本地址可以到中央仓库去搜索一下
入门代码
- 先定义一个接口
/**
 * 阳光沙滩AndroidWeb后台的接口
 */
public interface SobMiniWebInterface {

    @GET("/get/text")
    Call<JsonResult> getJson();

}
- 定义结果bean类
bean类代码比较多,我就不帖出来了。同学们可以使用gsonFormat自动生成,而结果的json数据样例可以在前面的接口文档里看到。
- 创建retrofit
 public void getJson(View view) {
        Retrofit retrofit = new Retrofit.Builder()
                .baseUrl("http:10.0.2.2:9102")
                .addConverterFactory(GsonConverterFactory.create())
                .build();
        SobMiniWebInterface sobMiniWebInterface = retrofit.create(SobMiniWebInterface.class);
        Call task = sobMiniWebInterface.getJson();
        task.enqueue(new Callback() {
            @Override
            public void onResponse(Call call,Response response) {
                Log.d(TAG,"response -- > " + response.body());
            }

            @Override
            public void onFailure(Call call,Throwable t) {
                Log.d(TAG,"exception -- > " + t.toString());
            }
        });
    }
- 执行结果:

okay啦,到这里就能体验到跟使用okhttp请求一样的功能。更加简单了。定义一个接口完事。而数据回来,就是一个bean类实体对象了。需要使用的地方,可以直接使用。
初步封装
如果我们每次使用,都要去创建Retrofit,那不是很麻烦吗?
所以我们可以把这些相关的配置,整合起来。把Retrofit的创建和配置定义成一个单例,这样子,我们要去发起请求的时候,直接使用单例获取就完事了。不用再重复去编写baseURL呀,转换器呀,连接时的相关属性,等等...
于是我们创建一个单例
package com.sunofbeaches.retrofitdemo;

import java.util.concurrent.TimeUnit;

import okhttp3.OkHttpClient;
import retrofit2.Retrofit;
import retrofit2.converter.gson.GsonConverterFactory;

public class RetrofitCreator {

    public static final String BASE_URL = "https://10.0.2.2:9102";
    public static final int CONNECT_TIME_OUT = 10000;//毫秒
    private Retrofit mRetrofit;


    private RetrofitCreator() {
        createRetrofit();
    }

    private void createRetrofit() {
        //设置一下okHttp的参数
        OkHttpClient okHttpClient = new OkHttpClient.Builder()
                .connectTimeout(CONNECT_TIME_OUT,TimeUnit.MILLISECONDS)
                .build();
        mRetrofit = new Retrofit.Builder()
                .baseUrl(BASE_URL)//设置BaseUrl
                .client(okHttpClient)//设置请求的client
                .addConverterFactory(GsonConverterFactory.create())//设置转换器
                .build();
    }

    private static RetrofitCreator sRetrofitCreator = null;

    public static RetrofitCreator getInstance() {
        if(sRetrofitCreator == null) {
            synchronized(RetrofitCreator.class) {
                if(sRetrofitCreator == null) {
                    sRetrofitCreator = new RetrofitCreator();
                }
            }
        }
        return sRetrofitCreator;
    }


    public Retrofit getRetrofit() {
        return mRetrofit;
    }


}
那使用变成怎么样了呢?
 public void getJson(View view) {
        SobMiniWebInterface sobMiniWebInterface = RetrofitCreator.getInstance().getRetrofit().create(SobMiniWebInterface.class);
        Call task = sobMiniWebInterface.getJson();
        task.enqueue(new Callback() {
            @Override
            public void onResponse(Call call,Response response) {
                Log.d(TAG,"response -- > " + response.body());
            }

            @Override
            public void onFailure(Call call,Throwable t) {
                Log.d(TAG,"exception -- > " + t.toString());
            }
        });
    }
如果多个地方使用呢?重复的代码是不是变少啦!
接口定义
前面我们定义了一个接口
/**
 * 阳光沙滩AndroidWeb后台的接口
 */
public interface SobMiniWebInterface {

    @GET("/get/text")
    Call<JsonResult> getJson();

}
这里我们可以看到有一个注解@Get
@Documented @Target(value=METHOD) @Retention(value=RUNTIME) public @interface GET Make a GET request.
从官方的API文档里我们可以看到这个注解是作用于方法,是一个运行时起作用的注解。创建一个get request 之前我们创建Request是new出来了。Retrofit则直接使用注解
知道这个,那就好办了!
那我post请求呢?是不也可以来一个@Post呢?
是的!Restrofit,rest就是Restful的意思,按这个套路,肯定有get、post、delete、put。当然还有其他的。
不知道restful风格api的同学可以去了解一下
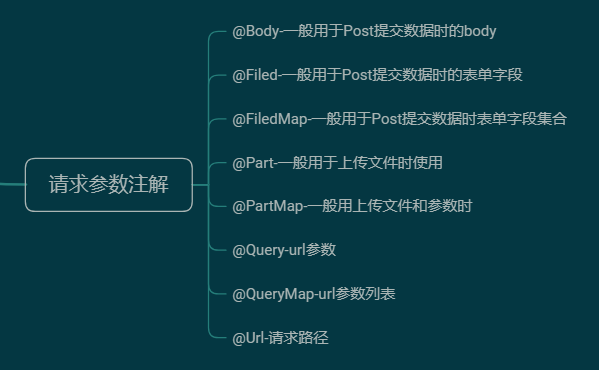
那咱们列一个思维导图吧
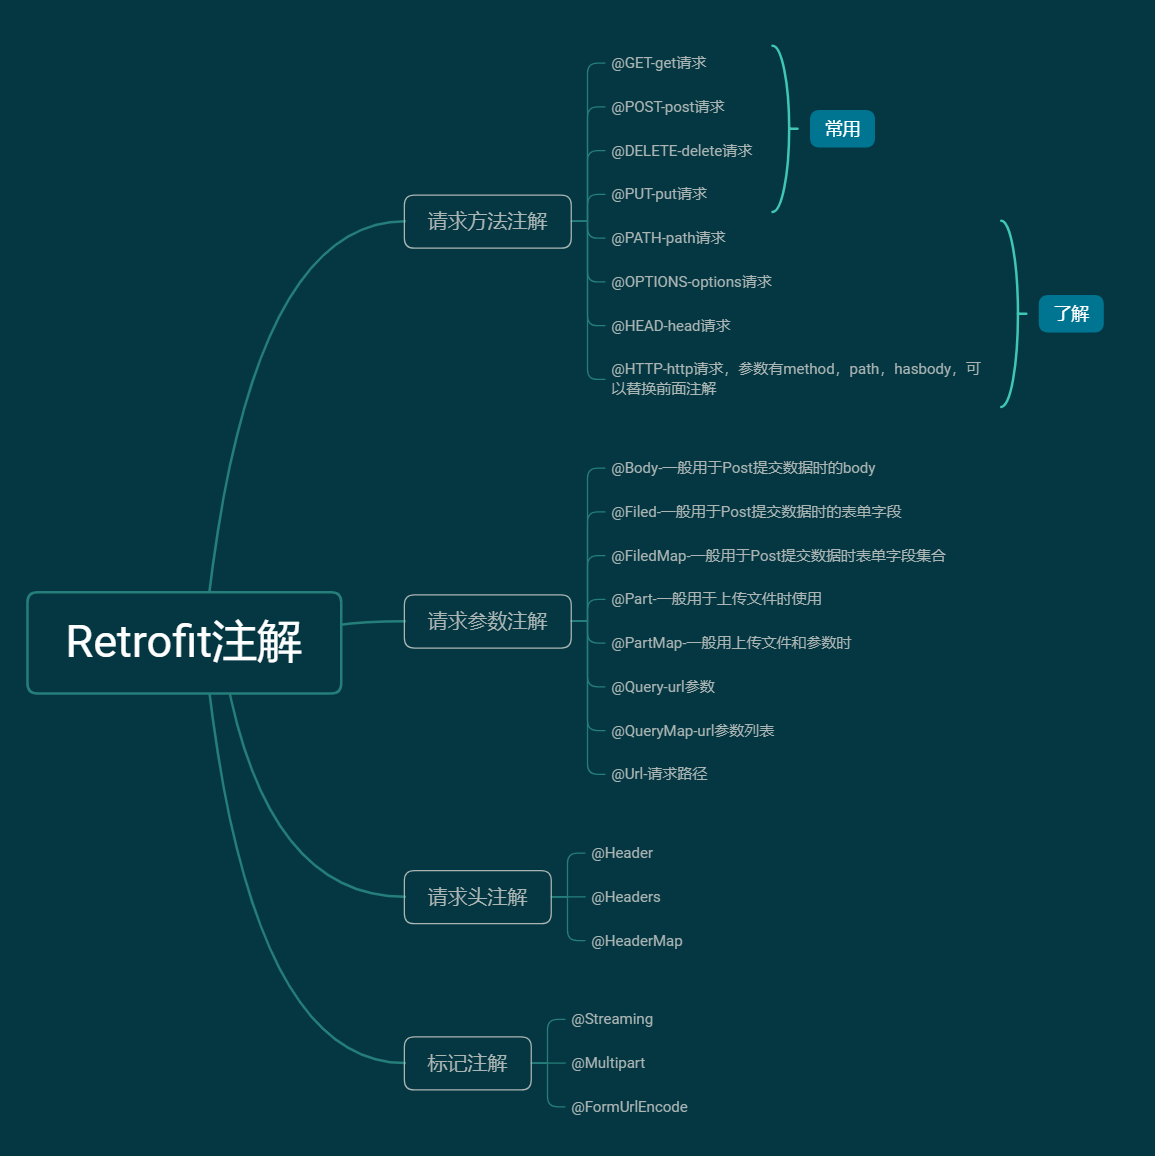
get请求
/**
 * 阳光沙滩AndroidWeb后台的接口
 */
public interface SobMiniWebInterface {

    @GET("/get/text")
    Call<JsonResult> getJson();

}
带参数的咋整呢?
比如说这个接口:
/get/param
参数: - keyword 关键字 - page 页码 - order 0 顺序 1 逆序
接口定义:两种写法都可以
    @GET("/get/param")
    Call<GetParamsResult> getWithParams(@Query("keyword") String keyword,@Query("page") int page,@Query("order") String order);

    @GET("/get/param")
    Call<GetParamsResult> getWithParams(@QueryMap Map<String,Object> params);
调用:
        Call<GetParamsResult> call = mSobMiniWebInterface.getWithParams("关键字测试",1,"1");
        call.enqueue(new Callback<GetParamsResult>() {
            @Override
            public void onResponse(Call<GetParamsResult> call,Response<GetParamsResult> response) {
                GetParamsResult result = response.body();
                Log.d(TAG,"result -- > " + result);
                if(result.getCode() == 10000) {
                    Log.d(TAG,"请求成功");
                    Log.d(TAG,"结果信息 --> " + result.getMessage());
                }
            }

            @Override
            public void onFailure(Call<GetParamsResult> call,Throwable t) {
                Log.d(TAG,"请求失败...onFailure");
            }
        });

        Map<String,Object> params = new HashMap<>();
        params.put("keyword","map 参数测试关键字");
        params.put("page",1);
        params.put("order","0");
        Call<GetParamsResult> mapTask = mSobMiniWebInterface.getWithParams(params);
        mapTask.enqueue(new Callback<GetParamsResult>() {
            @Override
            public void onResponse(Call<GetParamsResult> call,Response<GetParamsResult> response) {
                Log.d(TAG,"onResponse ==> " + response.body());
            }

            @Override
            public void onFailure(Call<GetParamsResult> call,Throwable t) {
                Log.d(TAG,"onFailure == > " + t.toString());
            }
        });
结果:
D/MainActivity: getWithParams..
D/MainActivity: result -- > GetParamsResult{success=true, code=10000, message='get带参数请求成功.', data=DataBean{page='1', keyword='关键字测试', order='逆序
D/MainActivity: 请求成功
D/MainActivity: 结果信息 --> get带参数请求成功.
到这里我们就学习了
@Qeury注解,@QueryMap注解
post请求,body携带字符串内容(json)
这个参数是body的内容
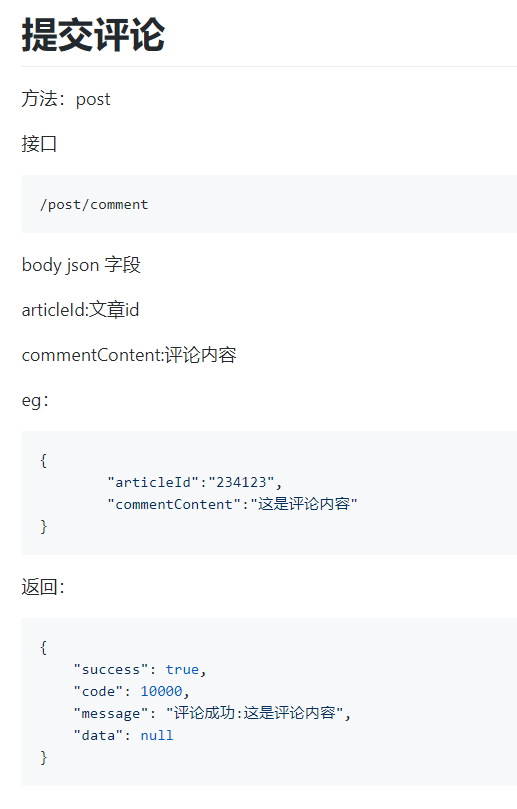
接口文档看前面呀。
定义接口
    @POST("/post/comment")
    Call<PostWithBodyResult> postWithBodyContent(@Body CommentItem commentItem);
调用代码
public void postWithBody(View view) {
        CommentItem commentItem = new CommentItem();
        commentItem.setArticleId("1251412341");
        commentItem.setCommentContent("这是我提交的测试评论内容...");
        Call<PostWithBodyResult> task = mSobMiniWebInterface.postWithBodyContent(commentItem);
        task.enqueue(new Callback<PostWithBodyResult>() {
            @Override
            public void onResponse(Call<PostWithBodyResult> call,Response<PostWithBodyResult> response) {
                Log.d(TAG,"response -- > " + response.body());
            }

            @Override
            public void onFailure(Call<PostWithBodyResult> call,Throwable t) {
                Log.d(TAG,"post with body...onFailure");
            }
        });
    }
结果:
D/MainActivity: response -- > PostWithBodyResult{success=true, code=10000, message='评论成功:这是我提交的测试评论内容...', data=null}
到这里我们就学习了@Body注解
post请求Url携带参数
接口:
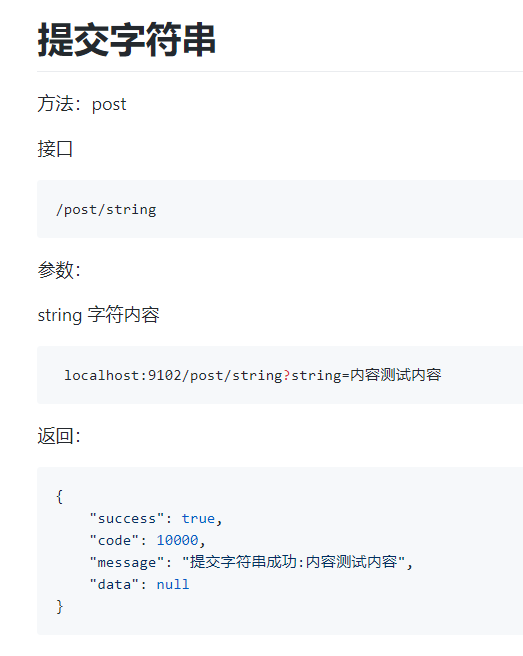
接口定义:
    @POST("/post/string")
    Call<PostWithUrlParamsResult> postWithUrlParams(@Query("string") String text);
调用
    public void postWithUrlParams(View view) {
        Call<PostWithUrlParamsResult> task = mSobMiniWebInterface.postWithUrlParams("这是我提交的参数内容");
        task.enqueue(new Callback<PostWithUrlParamsResult>() {
            @Override
            public void onResponse(Call<PostWithUrlParamsResult> call,Response<PostWithUrlParamsResult> response) {
                Log.d(TAG,"onResponse result -- > " + response.body());
            }

            @Override
            public void onFailure(Call<PostWithUrlParamsResult> call,Throwable t) {
                Log.d(TAG,"onFailure -- > " + t.toString());
            }
        });
    }
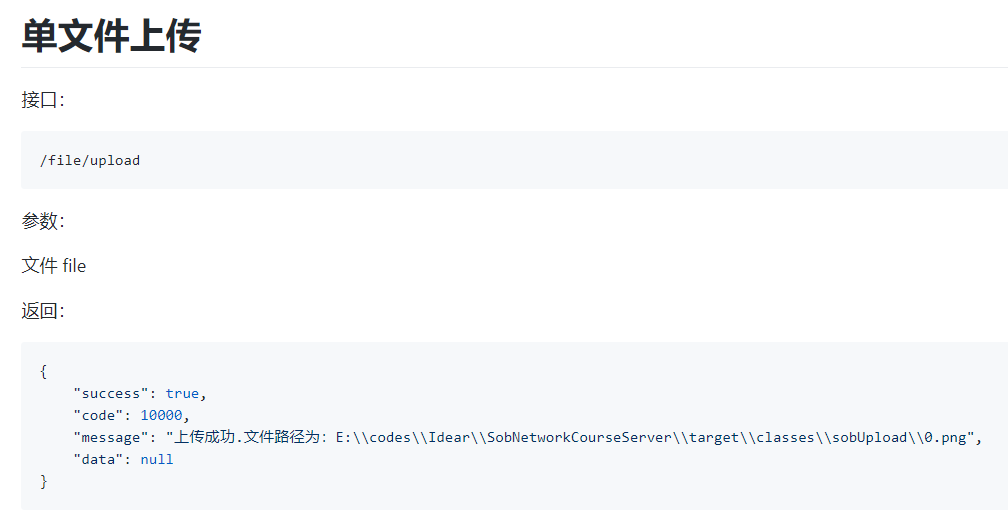
单文件上传
权限自行处理
@Part注解,要跟@Multipart注解一起使用。
而参数类型有三种:
- MultipartBody.Part
- RequestBody
- Other object
具体可以去看看文档
/**
   * The name of the part. Required for all parameter types except
   * {@link okhttp3.MultipartBody.Part}.
   */
除了MultipartBody.Part类型以外,其他的参数类型都要加上注解参数。
接口:
    @Multipart
    @POST("/file/upload")
    Call<FileUploadResult> postFile(@Part MultipartBody.Part file);
上传文件调用
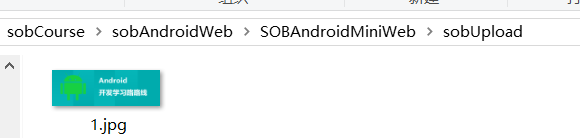
public void postFile(View view) {
        File file = new File("/storage/emulated/0/Download/1.jpg");
        MediaType mediaType = MediaType.parse("image/jpg");
        RequestBody fileBody = RequestBody.create(mediaType,file);
        MultipartBody.Part part = MultipartBody.Part.createFormData("file",file.getName(),fileBody);
        Call<FileUploadResult> task = mSobMiniWebInterface.postFile(part);
        task.enqueue(new Callback<FileUploadResult>() {
            @Override
            public void onResponse(Call<FileUploadResult> call,Response<FileUploadResult> response) {
                Log.d(TAG,"onResponse -- > " + response.body());
            }

            @Override
            public void onFailure(Call<FileUploadResult> call,Throwable t) {
                Log.d(TAG,"onFailure -- > " + t.toString());
            }
        });
    }
上传结果:

到这里我们就学习了@Part和@Multipart注解的使用了
上传文件及附带信息
提这个方式是为了跟大家了解@PartMap的使用
接口定义:
    @Multipart
    @POST("/multiFiles/upload")
    Call<FileUploadResult> postFileWithParams(@PartMap Map<String,Object> params,@Part MultipartBody.Part file);
调用:
    public void postMultiFile(View view) {
        Map<String,Object> params = new HashMap<>();
        MultipartBody.Part filePart = getPart("file","/storage/emulated/0/Download/rBsADV3nxtKACoSfAAAPx8jyjF8169.png");
        params.put("isFree","false");
        params.put("description","我是文件的描述内容...");
        Call<FileUploadResult> task = mSobMiniWebInterface.postFileWithParams(params,filePart);
        task.enqueue(new Callback<FileUploadResult>() {
            @Override
            public void onResponse(Call<FileUploadResult> call,Response<FileUploadResult> response) {
                Log.d(TAG,"onResponse -- > " + response.body());
            }

            @Override
            public void onFailure(Call<FileUploadResult> call,Throwable t) {
                Log.d(TAG,"onFailure -- >" + t.toString());
            }
        });
    }
结果:
onResponse -- > FileUploadResult{success=true, code=10000, message='上传成功.文件路径为:E:\codes\Idear\SobNetworkCourseServer\target\classes\sobUpload\rBsADV3nxtKACoSfAAAPx8jyjF8169.png', data=your descriptions is --> "我是文件的描述内容..." isFree == > "false"}
多文件上传
后台接口:
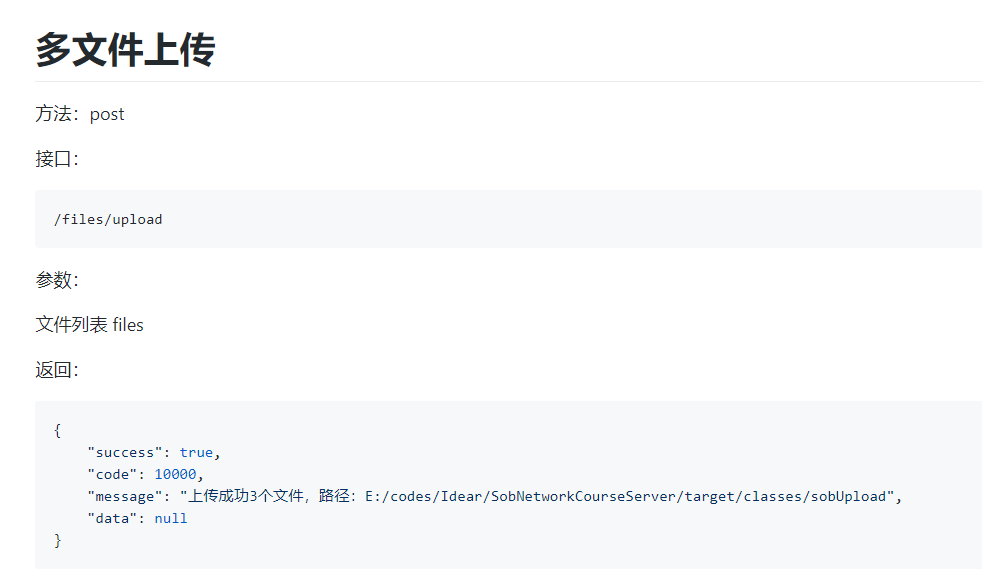
定义接口:
    @Multipart
    @POST("/files/upload")
    Call<FileUploadResult> postFiles(@Part List<MultipartBody.Part> files);
调用代码:
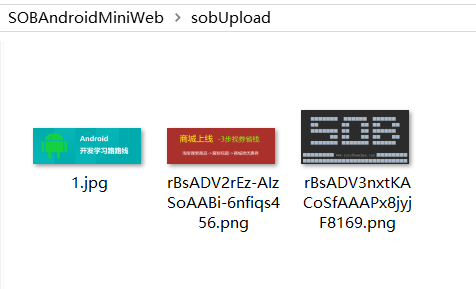
   public void postFiles(View view) {
        List<MultipartBody.Part> files = new ArrayList<>();
        files.add(getPart("files","/storage/emulated/0/Download/1.jpg"));
        files.add(getPart("files","/storage/emulated/0/Download/rBsADV3nxtKACoSfAAAPx8jyjF8169.png"));
        files.add(getPart("files","/storage/emulated/0/Download/rBsADV2rEz-AIzSoAABi-6nfiqs456.png"));

        Call<FileUploadResult> task = mSobMiniWebInterface.postFiles(files);
        task.enqueue(new Callback<FileUploadResult>() {
            @Override
            public void onResponse(Call<FileUploadResult> call,Response<FileUploadResult> response) {
                Log.d(TAG,"多文件上传结果" + response.body());
            }

            @Override
            public void onFailure(Call<FileUploadResult> call,Throwable t) {
                Log.d(TAG,"onFailure -- > 多文件上传失败 ---> " + t.toString());
            }
        });
    }
辅助方法
    private MultipartBody.Part getPart(String key,String filePath) {
        File file = new File(filePath);
        MediaType mediaType = MediaType.parse("image/jpg");
        RequestBody fileBody = RequestBody.create(mediaType,file);
        return MultipartBody.Part.createFormData(key,file.getName(),fileBody);
    }
多文件上传结果
FileUploadResult{success=true, code=10000, message='上传成功3个文件,路径:C:/Users/TrillGates/Desktop/SOBAndroidMiniWeb/sobUpload', data=null}
文件下载
接口

定义接口:
    @Streaming
    @GET
    Call<ResponseBody> downFile(@Url String url);
代码调用
ublic void downFile(View view) {
        Call<ResponseBody> task = mSobMiniWebInterface.downFile("/download/10");
        task.enqueue(new Callback<ResponseBody>() {
            @Override
            public void onResponse(Call<ResponseBody> call,Response<ResponseBody> response) {
                Headers headers = response.headers();
                for(int i = 0; i < headers.size(); i++) {
                    Log.d(TAG,headers.name(i) + " == " + headers.value(i));
                }
                writeFile2Sd(response,headers);
            }

            @Override
            public void onFailure(Call<ResponseBody> call,Throwable t) {
                Log.d(TAG,"onFailure -- > " + t.toString());
            }
        });
    }
同学们会发现,我们收取的内容,需要进行iO操作,但是主线程不可以做文件读取呀。
所以又整了一个子线程。
 private void writeFile2Sd(final Response<ResponseBody> response,final Headers headers) {
        new Thread(new Runnable() {
            @Override
            public void run() {
                String disposition = headers.get("Content-disposition");
                if(disposition != null) {
                    int fileNameIndex = disposition.indexOf("filename=");
                    Log.d(TAG,"fileNameIndex -- > " + fileNameIndex);
                    String fileName = disposition.substring(fileNameIndex + "filename=".length());
                    Log.d(TAG,"fileName -- > " + fileName);
                    File picFilePath = MainActivity.this.getExternalFilesDir(Environment.DIRECTORY_PICTURES);
                    Log.d(TAG,"picFilePath --> " + picFilePath);
                    File file = new File(picFilePath + File.separator + fileName);
                    Log.d(TAG,"file -- > " + file);
                    FileOutputStream fos = null;
                    try {
                        if(!file.getParentFile().exists()) {
                            file.getParentFile().mkdirs();
                        }
                        if(!file.exists()) {
                            file.createNewFile();
                        }
                        fos = new FileOutputStream(file);
                        InputStream inputStream = response.body().byteStream();
                        byte[] buf = new byte[1024];
                        int len;
                        while((len = inputStream.read(buf,0,buf.length)) != -1) {
                            fos.write(buf,0,len);
                        }
                    } catch(Exception e) {
                        e.printStackTrace();
                    } finally {
                        if(fos != null) {
                            try {
                                fos.close();
                            } catch(IOException e) {
                                e.printStackTrace();
                            }
                        }
                    }
                }
            }
        }).start();
    }
这样子特别不方便,对吧!也不优雅,所以后面我们就要引入RxJava去解决这个问题了。
RxJava可以很方便地切换线程。
下载结果
提交表单
方法:post 接口:/login
定义接口
    @FormUrlEncoded
    @POST("/login")
    Call<ResponseBody> doLogin(@Field("userName") String userName,@Field("password") String password);
调用代码
public void login(View view) {
        Call<ResponseBody> call = mSobMiniWebInterface.doLogin("root","admin");
        call.enqueue(new Callback<ResponseBody>() {
            @Override
            public void onResponse(Call<ResponseBody> call,Response<ResponseBody> response) {
                try {
                    Log.d(TAG,"onResponse -- >  " + response.body().string());
                } catch(IOException e) {
                    e.printStackTrace();
                }
            }

            @Override
            public void onFailure(Call<ResponseBody> call,Throwable t) {
                Log.d(TAG,"onFailure == > " + t.toString());
            }
        });
    }
运行结果:
{"success":true,"code":10000,"message":"这是你提交上来的数据:root - admin","data":"8920d231-20e4-46c6-9b41-9812730c4cce"}
到这里的话,我们就把@Failed搞定了,那@FailedMap呢?
相信聪明的你早就想到了,套路跟前面一样呀!
再来一个,定义接口
    @FormUrlEncoded
    @POST("/login")
    Call<ResponseBody> login(@FieldMap Map<String,Object> params);
调用代码
    public void login(View view) {
        // Call<ResponseBody> call = mSobMiniWebInterface.doLogin("root","admin");
        Map<String,Object> params = new HashMap<>();
        params.put("password","234123lkjsfa");
        params.put("userName","root");
        Call<ResponseBody> call = mSobMiniWebInterface.login(params);
        call.enqueue(new Callback<ResponseBody>() {
            @Override
            public void onResponse(Call<ResponseBody> call,Response<ResponseBody> response) {
                try {
                    Log.d(TAG,"onResponse -- >  " + response.body().string());
                } catch(IOException e) {
                    e.printStackTrace();
                }
            }

            @Override
            public void onFailure(Call<ResponseBody> call,Throwable t) {
                Log.d(TAG,"onFailure == > " + t.toString());
            }
        });
    }
运行结果
{"success":true,"code":10000,"message":"这是你提交上来的数据:root - 234123lkjsfa","data":"5af51e33-8c9c-4898-8c0e-bf44e0d2fc4f"}
Okay啦,到这里@FiledMap也搞定了
关于参数的接口
大家再review一下吧。
header注解
到这里我们基本上把相关注解的使用学习了一遍。

请求头注解我们还没使用上
怎么使用呢?
看码:
    @Multipart
    @POST("/file/upload")
    Call<FileUploadResult> postFile(@Part MultipartBody.Part file,@Header("token") String token);

    @Multipart
    @POST("/files/upload")
    Call<FileUploadResult> postFiles(@Part List<MultipartBody.Part> files,@HeaderMap Map<String,String> headers);

    @Headers({"token:231231","version:1.0","client:android"})
    @Multipart
    @POST("/file/params/upload")
    Call<FileUploadResult> postFileWithParams(@PartMap Map<String,Object> params,@Part MultipartBody.Part file);
其实我们很少这么用的,假如说,我们是为了用户验证,携带token的话,在每个方法都添加,那不是很麻烦吗?
而Okhttp是支持拦截器的,我们直接在每次请求的时候,在头部加上token就不可以了吗?
private void createRetrofit() {
        //设置一下okHttp的参数
        OkHttpClient okHttpClient = new OkHttpClient.Builder()
                .connectTimeout(CONNECT_TIME_OUT,TimeUnit.MILLISECONDS)
                .addInterceptor(mHeaderInterceptor)
                .build();
        mRetrofit = new Retrofit.Builder()
                .baseUrl(BASE_URL)//设置BaseUrl
                .client(okHttpClient)//设置请求的client
                .addConverterFactory(GsonConverterFactory.create())//设置转换器
                .build();
    }

    private Interceptor mHeaderInterceptor = new Interceptor() {
        @Override
        public Response intercept(Chain chain) throws IOException {
            Request request = chain.request().newBuilder()
                    .addHeader("token","204391jawslejqowejqwi")
                    .addHeader("version","1.2.0")
                    .addHeader("client","android铂金版")
                    .build();
            return chain.proceed(request);
        }
    };
PS:注解里的可以覆盖掉拦截器里的内容.

 拉大锯 回复 @ccTyL


