原创首发
基于lyric-parser、better-scroll歌词滚动高亮的实现

开始
在最近开发的项目中,涉及到歌词的解析以及当前播放歌词的高亮,歌词解析所用的是 lyric-parser
具体看文档配置,这里直接上代码。
歌词解析组件
NPM下载
首先拉取lyric-parser插件
npm install lyric-parser
在vue页面中使用
<script>
import Lyric from 'lyric-parser'
</script>
滚动插件
滚动插件使用的是 BetterScroll ,
BetterScroll 是一款重点解决移动端(已支持 PC)各种滚动场景需求的插件。它的核心是借鉴的 iscroll (opens new window)的实现,它的 API 设计基本兼容 iscroll,在 iscroll 的基础上又扩展了一些 feature 以及做了一些性能优化。这是官方原话。
NPM下载
npm install better-scroll --save
// or

yarn add better-scroll
使用
在vue页面中使用胚子如下,这里我直接封装了这个组件用于调用。具体配置看官方文档
<template>
  <div ref="wrapper">
    <slot></slot>
  </div>
</template>

<script type="text/ecmascript-6">
// 引入滑动插件
import BetterScroll from 'better-scroll'

// 定义两个常量,表示水平方向
const DIRECTION_H = 'horizontal'
// 定义两个常量,表示垂直方向
const DIRECTION_V = 'vertical'
export default {
  name: 'Scroll',
  // 接受组件传参
  props: {
    probeType: {
      type: Number,
      default: 1
    },
    click: {
      type: Boolean,
      default: false
    },
    listenScroll: {
      type: Boolean,
      default: false
    },
    data: {
      type: Array,
      default: null
    },
    pullup: {
      type: Boolean,
      default: false
    },
    beforeScroll: {
      type: Boolean,
      default: false
    },
    refreshDelay: {
      type: Number,
      default: 20
    },
    direction: {
      type: String,
      default: DIRECTION_V
    }
  },
  data() {
    return {

    }
  },
  watch: {
    data() {
      setTimeout(() => {
        this.refresh()
      }, this.refreshDelay)
    }
  },
  mounted() {
    setTimeout(() => {
      this.initScroll()
    }, 50)
  },
  methods: {
    // 初始化滚动
    initScroll() {
      if (!this.$refs.wrapper) {
        return
      }
      this.scroll = new BetterScroll(this.$refs.wrapper, {
        probeType: this.probeType,
        click: this.click,
        mouseWheel: true,
        eventPassthrough: this.direction === DIRECTION_V ? DIRECTION_H : DIRECTION_V
      })
      if (this.listenScroll) {
        this.scroll.on('scroll', (pos) => {
          this.$emit('scroll', pos)
        })
      }
      if (this.pullup) {
        this.scroll.on('scrollEnd', () => {
          if (this.scroll.y <= (this.scroll.maxScrollY + 50)) {
            this.$emit('scrollToEnd')
          }
        })
      }
      if (this.beforeScroll) {
        this.scroll.on('beforeScrollStart', () => {
          this.$emit('beforeScroll')
        })
      }
    },
    disable() {
      this.scroll && this.scroll.disable()
    },
    enable() {
      this.scroll && this.scroll.enable()
    },
    refresh() {
      this.scroll && this.scroll.refresh()
    },
    scrollTo() {
      this.scroll && this.scroll.scrollTo.apply(this.scroll, arguments)
    },
    scrollToElement() {
      this.scroll && this.scroll.scrollToElement.apply(this.scroll, arguments)
    }
  }
}
</script>

<style lang='less' scoped>
</style>
歌词显示组件
接着就是封装一个歌词显示的组件
<template>
  <div class="lyric-box">
    <Scroll
      class="lyric"
      ref="lyricList"
      :data="currentLyric && currentLyric.lines"
    >
      <div class="lyric-wrapper">
        <div v-if="currentLyric">
          <p
            ref="lyricLine"
            class="lyric-text"
            v-for="(item, index) in currentLyric.lines"
            :class="currentLyricNum === index ? 'active' : ''"
            :key="index"
            @click="clickLyricPlay(item)"
          >
            {{ item.txt }}
          </p>
        </div>
        <div class="no-lyric" v-else>暂无歌词,请搜索重试</div>
      </div>
    </Scroll>
  </div>
</template>

<script>
import Scroll from '../Scroll/'
export default {
  name: 'Lyric',
  data() {
    return {

    }
  },
  props: {
    currentLyricNum: {
      type: Number
    },
    currentLyric: {
      type: Object
    }
  },
  components: {
    Scroll
  },
  mounted() {

  },
  methods: {
    // 选中某一行播放
    clickLyricPlay() {

    },

  }
}
</script>

<style lang="less" scoped>
.lyric-box {
  .lyric {
    display: inline-block;
    vertical-align: top;
    width: 100%;
    height: 460px;
    overflow: hidden;
    .lyric-wrapper {
      width: 100%;
      margin: 0 auto;
      overflow: hidden;
      .lyric-text {
        line-height: 40px;
        height: 40px;
        border-radius: 10px;
        margin: 6px 2px;
        font-size: 1.3rem;
        font-weight: 500;
        color: @color-lyric-color;
        cursor: pointer;
        text-align: center;
        &:hover {
          background: @lyric-background;
          color: @color-dark;
        }
        &.active {
          color: @color-theme;
        }
        &::after {
          color: @color-blank;
        }
      }
      .no-lyric {
        color: @color-dark;
        text-align: center;
      }
    }
  }
}
</style>
在播放器页面中使用歌词组件,并且传值给该子组件
后端歌词接口对接
对接接口获取到接口返回的歌词数据,并且使用lyric-parser实例化歌词,进行歌词解析。
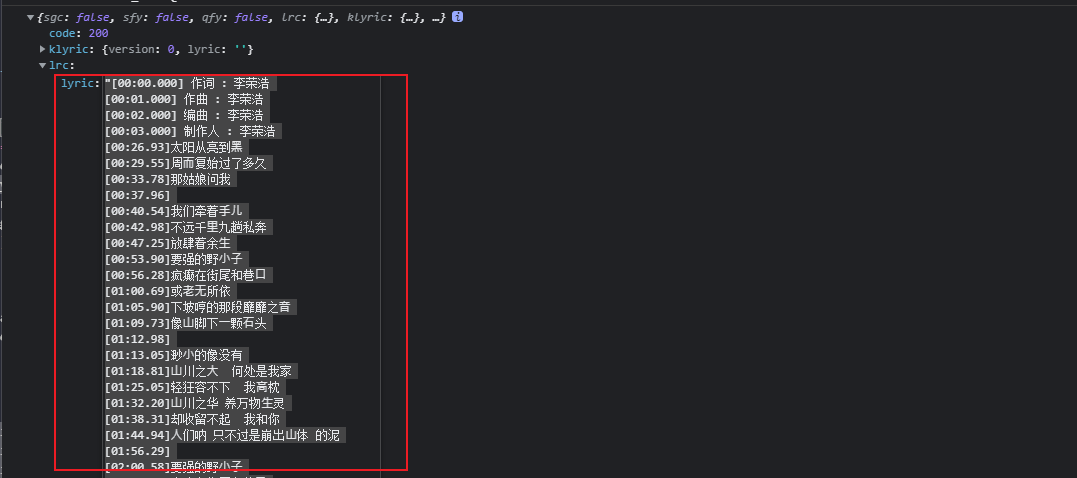
这里这个接口是获取到网易云的歌曲对应的歌词,看下面截图,这是获取接口返回的歌词。
从后台获取到歌词之后就是处理歌词了,代码看注释,注释基本上把要点都写了。
// 异步获取歌词,id是歌词id
    async getLyric(id) {
      try {
        let res = await getLyric(id)
        console.log(res)
         // this.constants.code_status是状态码,不用理会
        if (res.code === this.constants.code_status) {
          let lyric = res.lrc.lyric
          // 歌词处理,实例化一个对象,处理歌词,这里有两个参数,其实就是一个数据源和一个回调函数
          this.currentLyric = new Lyric(lyric, this.lyricHandle)
          // 判断歌曲是否准备好进行播放
          if (this.isPureMusic) {
             // 使用正则表达式处理,然后返回playingLyric,这就是处理之后的歌词
            this.playingLyric = this.currentLyric.lrc.replace(
              /\[(\d{2}):(\d{2}):(\d{2})\]/g,
              ''
            )
          } else {
            if (this.playing && this.canLyricPlay) {
              this.currentLyric.seek(this.currentTime * 1000)
            }
          }
        }
      } catch (error) {
        this.currentLyric = null
        this.playingLyric = ''
        this.currentLyricNum = 0
      }
    },
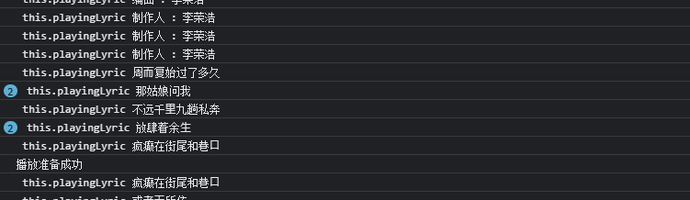
之后就是处理歌词的回调了,下面这几行代码就是讲歌词的回调赋值给当前实例对象上。
// 歌词的回调以及歌词在某一个位子固定
    lyricHandle({ lineNum, txt }) {
       //判断组件实例对象是否存在
      if (!this.$refs.lyricRef.$refs.lyricList) {
        return
      }
      // 歌词的行数
      this.currentLyricNum = lineNum
      // 返回的歌词
      this.playingLyric = txt
      // 判断当前歌词行数是否大于5,其实是第六行,然后当歌词滚动到第六行之后不再向下滚动,也是实现歌词高亮的一种效果,就是操作虚拟don来实现的,
      // 这里为什么是有两个$refs,是由于这个是涉及到三个组件之间的dom。
      if (lineNum > 5) {
        let line = this.$refs.lyricRef.$refs.lyricLine[lineNum - 5]
        if (this.$refs.lyricRef.$refs.lyricList) {
          this.$nextTick(() => {
            this.$refs.lyricRef.$refs.lyricList.scrollToElement(line, 1000)
          })
        }
      } else {
        if (this.$refs.lyricRef.$refs.lyricList) {
          this.$nextTick(() => {
            this.$refs.lyricRef.$refs.lyricList.scrollTo(0, 0, 1000)
          })
        }
      }
    },
进过处理的歌词

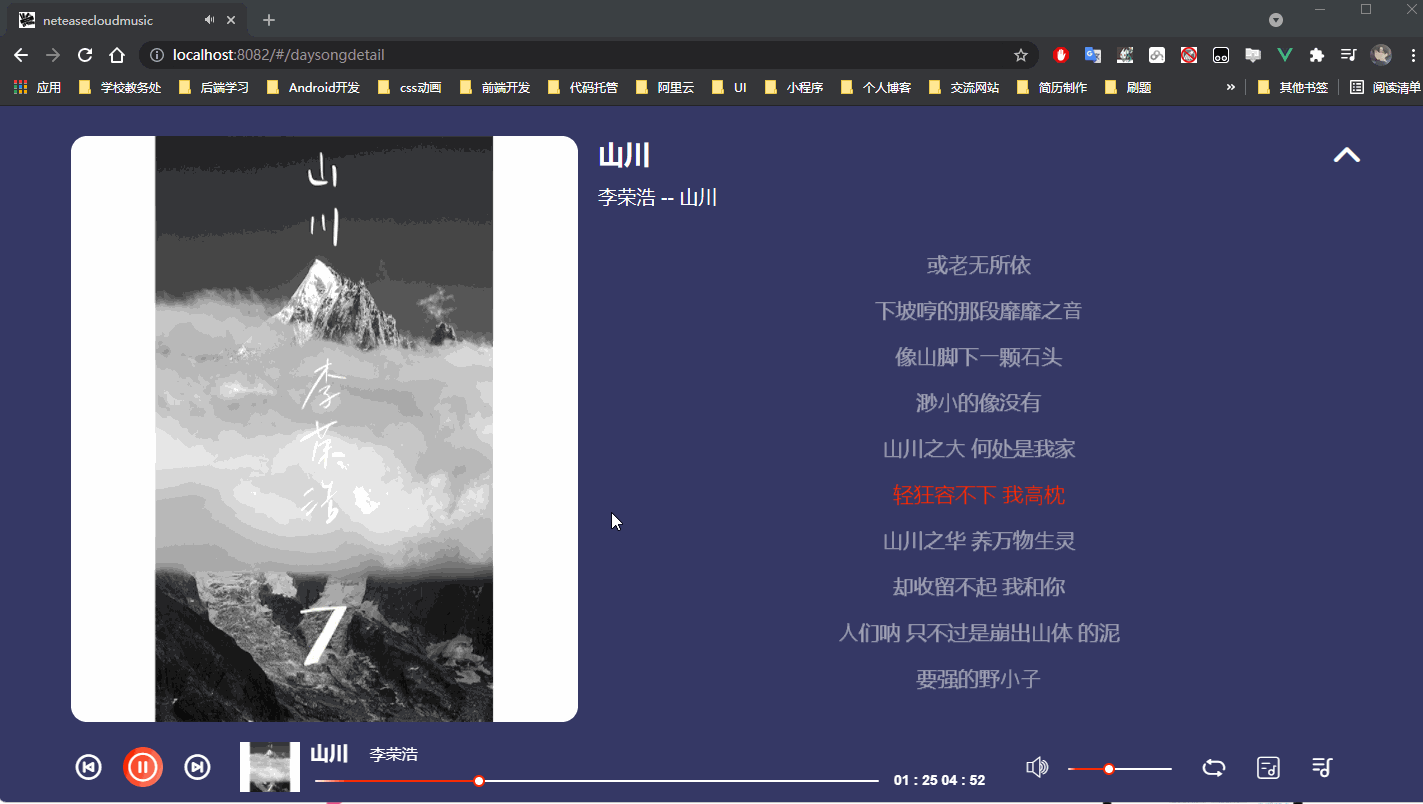
之后基本上就完成了歌词的处理以及滚动了。看一下效果图。