1.权限检查
有的用户在初次安装时,可能会禁止通知权限,这时我们需要引导用户开启通知权限
 private fun checkPermission():Boolean{
        //检查是否申请了权限
        val hasPermission = NotificationManagerCompat.from(this).areNotificationsEnabled()
        val localIntent = Intent()
        if(hasPermission){
            return true
        }
        if(Build.VERSION.SDK_INT >= Build.VERSION_CODES.O){
            localIntent.addFlags(Intent.FLAG_ACTIVITY_NEW_TASK)
            localIntent.action = "android.settings.APPLICATION_DETAILS_SETTINGS"
            localIntent.data = Uri.fromParts("package",this.packageName,null)
        }else if(Build.VERSION.SDK_INT  >= Build.VERSION_CODES.LOLLIPOP){
            //5.0 以上到8.0 以下
            localIntent.action = "android.settings.APP_NOTIFICATION_SETTINGS";
            localIntent.putExtra("app_package", packageName);
            localIntent.putExtra("app_uid", applicationInfo.uid);
        }else{
            //android 5.0 以下
            localIntent.action = Settings.ACTION_APPLICATION_DETAILS_SETTINGS
            localIntent.addCategory(Intent.CATEGORY_DEFAULT);
            localIntent.data = Uri.parse("package:$packageName");

        }
	//跳转到设置页面
        startActivity(localIntent)
        return false
    }
为了展示效果,先到设置处关闭应用的通知权限,实际运行结果如下 
2.创建通知并进行版本兼容处理
private fun createNotification(notificationId:Int,title:String,content:String,channelId:String,channelName:String,importance:Int){
       if(checkPermission()){
           val manager = getSystemService(NOTIFICATION_SERVICE) as NotificationManager
           val intent = Intent(this, MainActivity::class.java)
           val pendingIntent = PendingIntent.getActivity(this, 0, intent, 0)
           if(Build.VERSION.SDK_INT > Build.VERSION_CODES.O) {
               /*1.先创建channel对象
               * 2.然后通过notification 对象创建渠道*/

               val channel =
                   NotificationChannel(channelId, channelName, importance)
               manager.createNotificationChannel(channel)
           }
           val notification  = NotificationCompat.Builder(this@NotificationActivity,channelId)
               .setContentTitle(title)
               .setContentText(content)
               .setSmallIcon(R.mipmap.ic_launcher)
               .setContentIntent(pendingIntent)
		.setImportance()
               .setAutoCancel(true)
               .build()
           manager.notify(notificationId,notification)
       }
   }
代码中尽量使用NotificationCompat 这个NotificationCompat这个类而不是Notification类来创建通知,因为不同版本的Api都对Notification这个类进行了修改,导致兼容性不好,NotificationCompat这个包是谷歌官方出的兼容包,自动处理各个版本的兼容性问题,最低兼容到Android4.1, 版本的兼容性官方文档
3.通知常用的API
Notification notification = new NotificationCompat.Builder(this)
                .setSmallIcon(R.drawable.ic_action_new)    //设置小图标,用于状态栏左上角显示
                .setContentTitle("Notification Title")      //设置标题
                .setContentText("Notification content text.")
                .setContentInfo("Content info")
                .setSubText("sub text")
                .setTicker("ticker...")                      //通知到来时状态栏闪过的信息,API21以后不再显示
                .setDefaults(NotificationCompat.DEFAULT_ALL)//设置默认的灯光,提示音和振动,可选值:DEFAULT_ALL,DEFAULT_SOUND,DEFAULT_VIBRATE,DEFAULT_LIGHTS
//                .setLights()
//                .setSound()
//                .setVibrate()
                .setNumber(10)                             //已经被 setSubText取代,显示在时间下方的内容
                .setVisibility(NotificationCompat.VISIBILITY_PUBLIC)//5.0以后添加
                .setWhen(System.currentTimeMillis())        //设置通知上显示的时间
                .setShowWhen(true)                          //通知是否显示时间
                .setUsesChronometer                         // 设置是否显示时钟表示时间
                .setChronometerCountDown(false);   // 设置时钟是否为倒计时
                .setLargeIcon(BitmapFactory.decodeResource(getResources(),R.drawable.largeicon))  //设置大图标
                .setPriority(NotificationCompat.PRIORITY_MAX) //设置等级,可选值有PRIORITY_MIN(-2),PRIORITY_LOW(-1),PRIORITY_DEFAULT(0),PRIORITY_HIGH(1),PRIORITY_MAX(2),默认为0
                .setOngoing(false)                            //设置是否为正在进行的通知。设置为true表示有相关动作正在执行,比如播放音乐。ongoing状态的通知是不会自动消失,也不能手动清除的。除非调用Manager的cancel方法
                .setAutoCancel(true)                          //是否自动消失,true表示响应点击之后自动消失。
                .build();                                     //API16添加,API11使用getNotification()

        NotificationManager manager = (NotificationManager) getSystemService(NOTIFICATION_SERVICE);
        manager.notify(1, notification);
前面3个APIsetSmallIcon(),setContentTitle(),setContentText()是必选项,其他可以选用 - setSmallIcon(int):设置右下角的小图标,在接收到通知的时候顶部也会显示这个小图标 - setContentTitle(CharSequence):设置标题 - setContentText(CharSequence):设置内容 - setSubText(CharSequence):设置应用名称后面的一行小字 - setTicker(CharSequence):设置收到通知时在顶部显示的文字信息 - setWhen(long):设置通知时间,一般设置的是收到通知时的System.currentTimeMillis()
- setLargeIcon(Bitmap):设置左边的大图标
- setAutoCancel(boolean):用户点击Notification点击面板后是否让通知取消(默认不取消)
- setDefaults(int):向通知添加声音、闪灯和振动效果的最简单、 使用默认(defaults)属性,可以组合多个属性,
- Notification.DEFAULT_VIBRATE(添加默认震动提醒);
- Notification.DEFAULT_SOUND(添加默认声音提醒);
- Notification.DEFAULT_LIGHTS(添加默认三色灯提醒)
- Notification.DEFAULT_ALL(添加默认以上3种全部提醒)
- setVibrate(long[]):设置振动方式,比如:
- setVibrate(new long[] {0,300,500,700});延迟0ms,然后振动300ms,在延迟500ms, 接着再振动700ms,关于Vibrate用法后面会讲解!
- setLights(int argb, int onMs, int offMs):设置三色灯,参数依次是:灯光颜色, 亮持续时间,暗的时间,不是所有颜色都可以,这跟设备有关,有些手机还不带三色灯; 另外,还需要为Notification设置flags为Notification.FLAG_SHOW_LIGHTS才支持三色灯提醒! setSound(Uri):设置接收到通知时的铃声,可以用系统的,也可以自己设置,例子如下:
- .setDefaults(Notification.DEFAULT_SOUND) //获取默认铃声
- .setSound(Uri.parse("file:///sdcard/xx/xx.mp3")) //获取自定义铃声
-
.setSound(Uri.withAppendedPath(Audio.Media.INTERNAL_CONTENT_URI, "5")) //获取Android多媒体库内的铃声
-
setOngoing(boolean):设置为ture,表示它为一个正在进行的通知。他们通常是用来表示 一个后台任务,用户积极参与(如播放音乐)或以某种方式正在等待,因此占用设备(如一个文件下载, 同步操作,主动网络连接)
-
setProgress(int,int,boolean):设置带进度条的通知 参数依次为:进度条最大数值,当前进度,进度是否不确定 如果为确定的进度条:调用setProgress(max, progress, false)来设置通知, 在更新进度的时候在此发起通知更新progress,并且在下载完成后要移除进度条 ,通过调用setProgress(0, 0, false)既可。如果为不确定(持续活动)的进度条, 这是在处理进度无法准确获知时显示活动正在持续,所以调用setProgress(0, 0, true) ,操作结束时,调用setProgress(0, 0, false)并更新通知以移除指示条
- setContentIntent(PendingIntent):PendingIntent和Intent略有不同,它可以设置执行次数, 主要用于远程服务通信、闹铃、通知、启动器、短信中,在一般情况下用的比较少。比如这里通过 Pending启动Activity:getActivity(Context, int, Intent, int),当然还可以启动Service或者Broadcast PendingIntent的位标识符(第四个参数): FLAG_ONE_SHOT 表示返回的PendingIntent仅能执行一次,执行完后自动取消 FLAG_NO_CREATE 表示如果描述的PendingIntent不存在,并不创建相应的PendingIntent,而是返回NULL FLAG_CANCEL_CURRENT 表示相应的PendingIntent已经存在,则取消前者,然后创建新的PendingIntent, 这个有利于数据保持为最新的,可以用于即时通信的通信场景 FLAG_UPDATE_CURRENT 表示更新的PendingIntent
4.通知的优先级
通知有5个不同的优先级,下面是它们的区别
 * IMPORTANCE_NONE 关闭通知
 * IMPORTANCE_MIN 开启通知,不会弹出,但没有提示音,状态栏中无显示
 * IMPORTANCE_LOW 开启通知,不会弹出,不发出提示音,状态栏中显示
 * IMPORTANCE_DEFAULT 开启通知,不会弹出,发出提示音,状态栏中显示
 * IMPORTANCE_HIGH 开启通知,会弹出,发出提示音,状态栏中显示 (支付宝上支付成功时有出现)
android 8.0 以下可以使用API NotificationCompat.Builder().setPriority() 设置通知的优先级 android 8.0 以上使用NotificationChannel.setImportance()设置通知的优先级,或者直接在channel的构造函数中将优先级传进去,如下面所示 另外用户对通知拥有着最高级别的控制权,无论通知等级有多高,用户都可以通过设置来禁止
val channel = NotificationChannel(channelId, channelName, importance)
5.通知id,channelId,channelName的区别和作用
- 每个通知Id,对应一个通知,当初次调用NotificationManager.notify(notificationId,notification)时,会根据NotificationCompat.Builder()里面配置的内容创建一个通知。 再次调用NotificationManager.notifiy(notificationId,notification)时,会根据这个notificationId(通知Id)来更新通知里面的内容。
- channelId:channelId(渠道Id) 是给开发者看的,用来将通知绑定到特定的渠道Id,
- channelName:是渠道名称是给用户看的,它和channelId是一一对应的关系,用户可以通过设置,关闭某个特定的渠道,这样这个渠道里面的所有通知都会被屏蔽,除非用户再次开启这个渠道
下面是抖音的渠道名,可以根据特定的渠道关闭特定的通知,这里可能有同名的渠道,这对用户来说不太友好,导致某些重要的通知被错误的关闭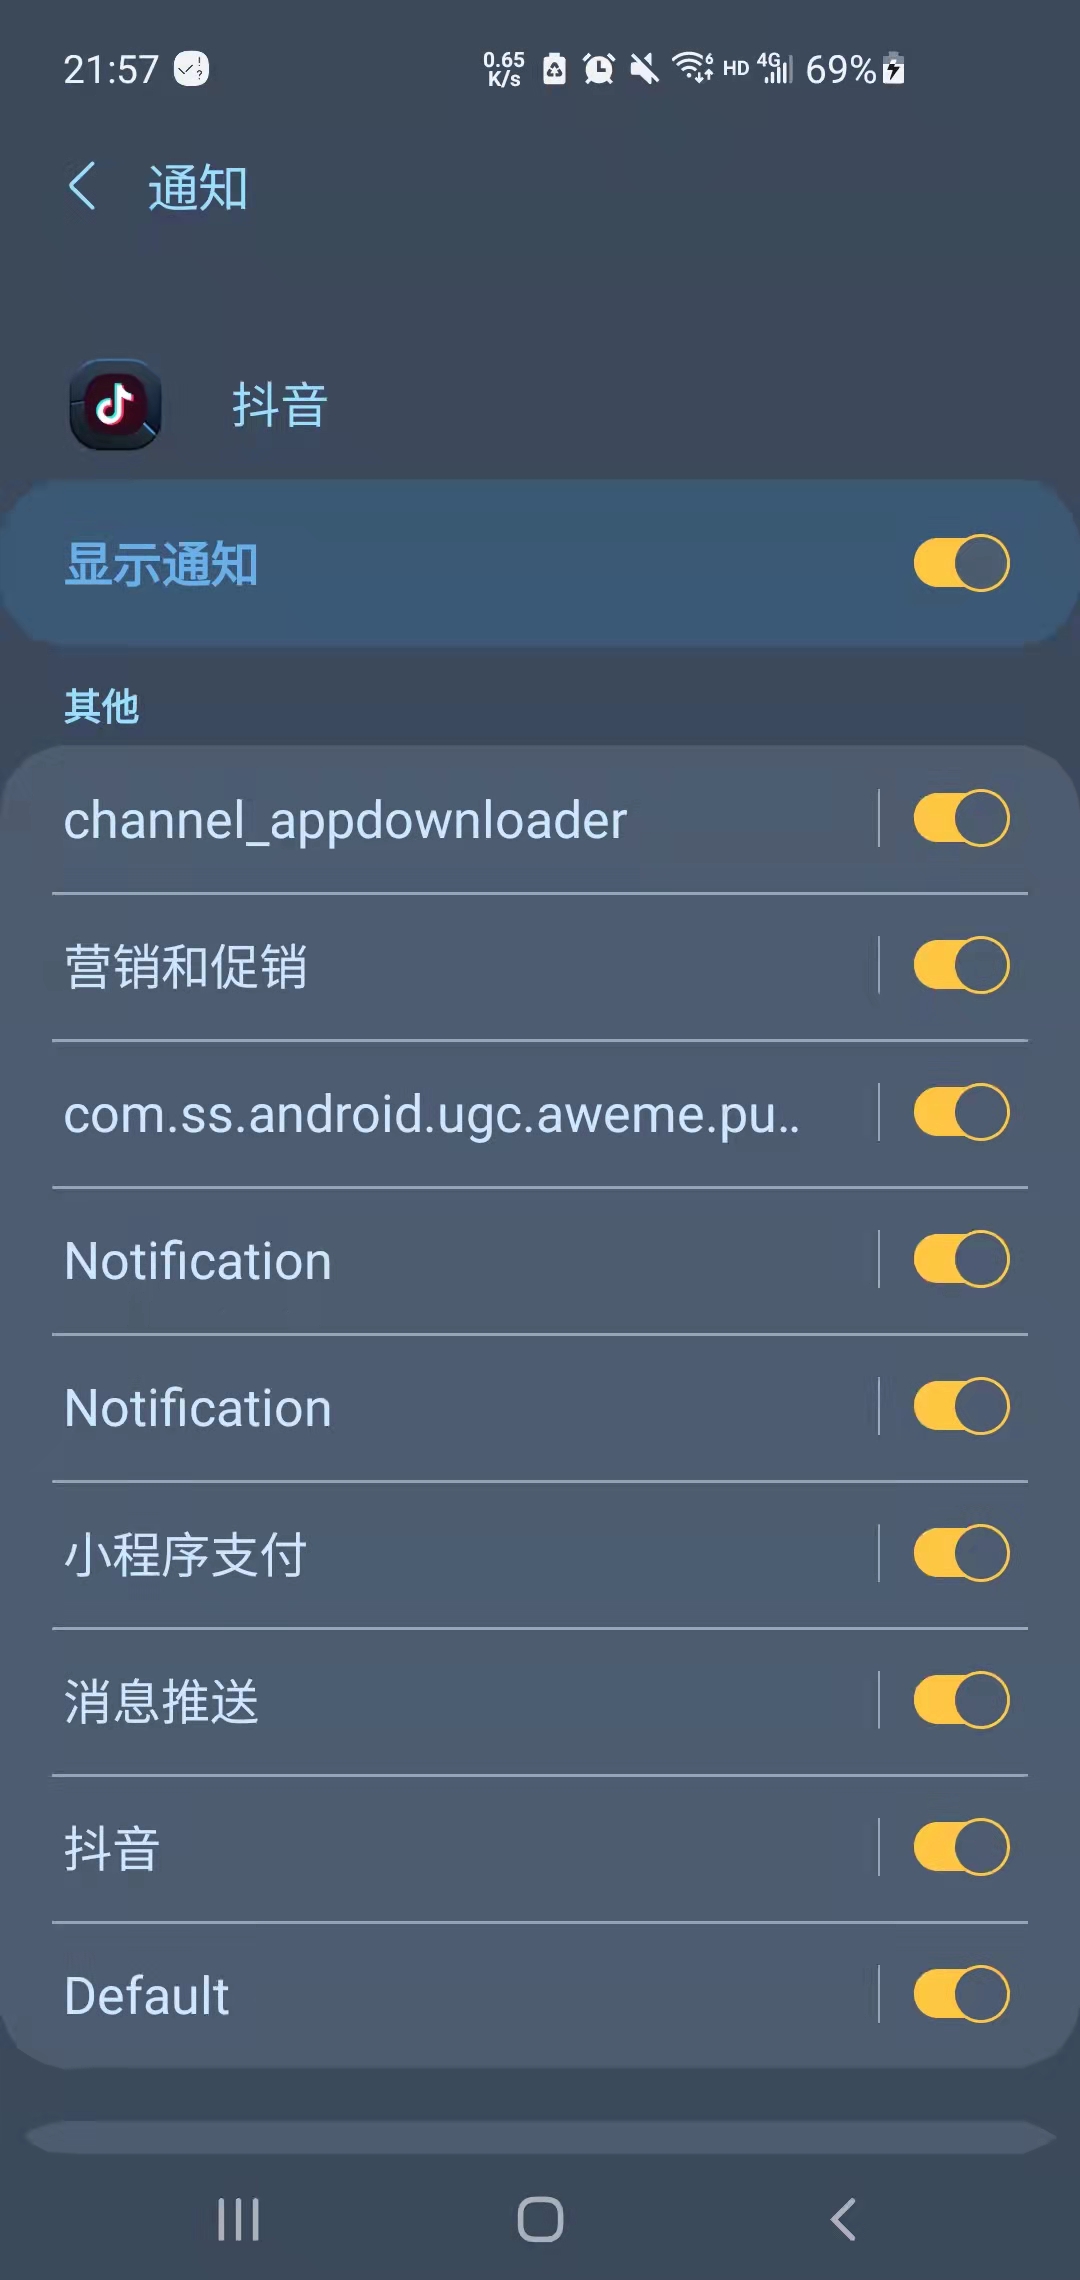
6.设置角标数量
代码如下
 private fun createNotificationForHigh() {
        val intent = Intent(this, MaterialButtonActivity::class.java)
        val pendingIntent = PendingIntent.getActivity(this, 0, intent, PendingIntent.FLAG_IMMUTABLE)
        if (Build.VERSION.SDK_INT >= Build.VERSION_CODES.O) {
            val channel = NotificationChannel(mHighChannelId, mHighChannelName, NotificationManager.IMPORTANCE_HIGH)
            channel.setShowBadge(true) //设置显示角标
            mManager.createNotificationChannel(channel)
        }
        mBuilder = NotificationCompat.Builder(this@NotificationActivity, mHighChannelId)
            .setContentTitle("重要通知")
            .setContentText("重要通知内容")
            .setSmallIcon(R.mipmap.ic_launcher)
            .setLargeIcon(BitmapFactory.decodeResource(resources, R.mipmap.ic_avatar))
            .setAutoCancel(true)
            .setNumber(999) // 自定义桌面通知数量
            .addAction(R.mipmap.ic_avatar, "去看看", pendingIntent)// 通知上的操作
            .setCategory(NotificationCompat.CATEGORY_MESSAGE) // 通知类别,"勿扰模式"时系统会决定要不要显示你的通知
            .setVisibility(NotificationCompat.VISIBILITY_PRIVATE) // 屏幕可见性,锁屏时,显示icon和标题,内容隐藏
        mManager.notify(mHighNotificationId, mBuilder.build())
    }
- setNumber 桌面通知数量
- addAction 通知上的操作
- setCategory 通知类别,"勿扰模式"时系统会决定要不要显示你的通知
- setVisibility 屏幕可见性,锁屏时,显示icon和标题,内容隐藏,解锁查看全部 调用setNumber之前要调用channel.setShowBadge(true),否则看不到通知数量,实际运行中,同样代码在模拟器不可见,真机上可见,不知道是不是bug
7.展开式通知
7.1多行文本通知
通常我们的文本不止一行,默认情况下,超过一行的内容会被折叠,这时我们可以使用多行文本通知
//多行文字通知
    private fun createMultiLineNotification(channelId: String,notificationId: Int){
        val manager = getSystemService(NOTIFICATION_SERVICE) as NotificationManager
        val intent = Intent(this@NotificationActivity,PromotionActivity::class.java)
        val pendingIntent = PendingIntent.getActivity(this,0,intent,0)
        if(Build.VERSION.SDK_INT >= Build.VERSION_CODES.O){
            val channel = NotificationChannel(channelId,"促销",NotificationManager.IMPORTANCE_HIGH)
            manager.createNotificationChannel(channel)

        }

        val notification = NotificationCompat.Builder(this@NotificationActivity,channelId)
            .setContentIntent(pendingIntent)
            .setSmallIcon(R.mipmap.ic_launcher)
            .setStyle(NotificationCompat.BigTextStyle().bigText("多行通知\n 多行通知\n 多行通知"))
            .setContentTitle("多行文字通知")
            .build()
        manager.notify(notificationId,notification)
    }
运行效果如下: 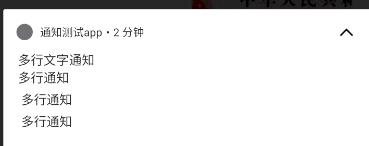
7.2大图片通知
 //带大图的展开式通知
    private fun createBigPictureNotification(channelId:String,notificationId: Int){
        val manager = getSystemService(NOTIFICATION_SERVICE) as NotificationManager
        val intent = Intent(this@NotificationActivity,PromotionActivity::class.java)
        val pendingIntent = PendingIntent.getActivity(this,0,intent,0)
        if(Build.VERSION.SDK_INT >= Build.VERSION_CODES.O){
            val channel = NotificationChannel(channelId,"促销",NotificationManager.IMPORTANCE_HIGH)
            manager.createNotificationChannel(channel)

        }
        val bitmap = BitmapFactory.decodeResource(resources,R.drawable.dragon_cat)
        val notification = NotificationCompat.Builder(this@NotificationActivity,channelId)
            .setContentIntent(pendingIntent)
            .setSmallIcon(R.mipmap.ic_launcher)
            .setContentText("带大图的展开式通知")
            .setContentTitle("带图片的通知")
            .setStyle(NotificationCompat.BigPictureStyle().bigPicture(bitmap))
            .build()
        manager.notify(notificationId,notification)
    }
运行效果如下: 点击右上角的展开可以查看大图,再次点击只能看到contentTitle,contentText, 
7.3.进度条通知
我们通常下载一个不大的文件,用户可能需要切换到其他页面,这时我们可以通过通知让用户知道下载进度,同时要注意到通知的Id,后面要使用这个通知的id,使用setProcegress来更新进度
    private fun createNotificationWithProcess(channelId: String,notificationId: Int,progressCurrent:Int){
        val manager = getSystemService(NOTIFICATION_SERVICE) as NotificationManager
        val intent = Intent(this@NotificationActivity,PromotionActivity::class.java)
        val pendingIntent = PendingIntent.getActivity(this,0,intent,0)
        val maxProcess = 100
        if(Build.VERSION.SDK_INT >= Build.VERSION_CODES.O){
            val channel = NotificationChannel(channelId,"促销",NotificationManager.IMPORTANCE_HIGH)
            manager.createNotificationChannel(channel)
        }

        val notification = NotificationCompat.Builder(this@NotificationActivity,channelId)
            .setContentIntent(pendingIntent)
            .setSmallIcon(R.mipmap.ic_launcher)
            .setContentText("下载中:$progressCurrent %")
            .setContentTitle("进度通知")
            .setProgress(maxProcess,progressCurrent,false)
            .build()
        manager.notify(notificationId,notification)
    }
通过setProgress配置进度,接收3个参数:
- max 最大值
- progress 当前进度
- indeterminate false表示确定的进度,比如100,true表示不确定的进度,会一直显示进度动画,直到更新状态完成,或删除通知
更新分为两种情况:
- 更新进度:修改进度值
- 下载完成,总进度与当前进度都设置为0即可,同时修改相关提示
7.4 添加媒体通知
通常我们使用本地的音乐播放器,还需要创建一个前台服务,并和通知配合使用,
if (Build.VERSION.SDK_INT >= Build.VERSION_CODES.O) {
            NotificationManager notificationManager = (NotificationManager) getSystemService(Context.NOTIFICATION_SERVICE);
            String id = "imservice";
            String name = "前台通知渠道测试";
            String description = "测试内容";
            int importance = 0;
            NotificationChannel mChannel = new NotificationChannel(id, (CharSequence) name, importance);
            mChannel.setSound((Uri) null, (AudioAttributes) null);
            mChannel.setDescription(description);
            notificationManager.createNotificationChannel(mChannel);
            int notifyID = 999;
            Notification notification = (new Notification.Builder((Context) this))
                    .setContentTitle((CharSequence) name)
                    .setContentText((CharSequence) description)
                    .setLargeIcon(BitmapFactory.decodeResource(this.getResources(), R.mipmap.ic_channel_1))
                    .addAction(R.drawable.iv_pre,"上一首",preIntent)
                    .addAction(R.drawable.iv_pause,"暂停",pauseIntent)
                    .addAction(R.drawable.iv_next,"下一首",nextIntent)
                    .setSmallIcon(R.mipmap.ic_channel)
//                    .setContentIntent(this.getIntent())
                    .setChannelId(id).build();
            this.startForeground(notifyID, notification);
        }
如何获取mediaSession 创建媒体播放的通知 这里是传送门,主要是注意,官方示例中使用的是v4包下的MediaStyle(),我试了,但是没有效果,后面换成androidx包下的Media就好了,如果找不到androidx.media.app.NotificationCompat包的话,需要导入implementation 'androidx.media:media:1.3.0'依赖,这个官网没写清楚,要我找了好久。
7.5 自定义通知内容
//自定义通知布局
    private fun createNotificationWithCustomView(channelId: String,notificationId: Int){
        val manager = getSystemService(NOTIFICATION_SERVICE) as NotificationManager
        val intent = Intent(this@NotificationActivity,PromotionActivity::class.java)
        val pendingIntent = PendingIntent.getActivity(this,0,intent,0)
        val notificationLayout = RemoteViews(packageName,R.layout.notificaiton_small)
        val notificationExpand = RemoteViews(packageName,R.layout.notification_expand)
        if(Build.VERSION.SDK_INT >= Build.VERSION_CODES.O){
            val channel = NotificationChannel(channelId,"促销",NotificationManager.IMPORTANCE_HIGH)
            manager.createNotificationChannel(channel)
        }

        val bitmap = BitmapFactory.decodeResource(resources,R.drawable.dragon_cat)
        val notification = NotificationCompat.Builder(this@NotificationActivity,channelId)
            .setContentIntent(pendingIntent)
            .setSmallIcon(R.mipmap.ic_launcher)
            .setStyle(NotificationCompat.DecoratedCustomViewStyle()
            )
            .setContentText("通知内容")
            .setContentTitle("通知")
            .setOngoing(true)
            .setCustomContentView(notificationLayout)
            .setCustomBigContentView(notificationExpand)
            .setLargeIcon(bitmap)
            .build()
        manager.notify(notificationId,notification)
    }
未展开效果图如下: 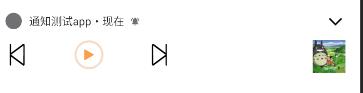 展开效果图如下
- 自定义布局的xml中不能使用约束性布局,否则会报错,
- 普通的自定义布局,请采用setStyle(NotificationCompat.DecoratedCustomViewStyle() );
- 如果要为媒体播放控件创建自定义通知,请采纳同样的建议,但改用 NotificationCompat.DecoratedMediaCustomViewStyle 类
- 通知的背景颜色可能会因设备和版本而异。因此,您应始终在自定义布局中应用支持库样式,例如对文本使用 TextAppearance_Compat_Notification,对标题使用 TextAppearance_Compat_Notification_Title。这些样式会适应颜色的变化,因此不会出现黑色文本采用黑色背景或白色文本采用白色背景的情况 示例如下:
    <TextView
        android:layout_width="wrap_content"
        android:layout_height="match_parent"
        android:layout_weight="1"
        android:text="@string/notification_title"
        android:id="@+id/notification_title"
        style="@style/TextAppearance.Compat.Notification.Title" />
8.PendingIntent
- PendingIntent这个类用于处理即将发生的事情,比如在通知Notification中用于跳转页面,但不是马上跳转。
- Intent是及时启动,intent 随所在的activity 消失而消失。
PendingIntent可以看作是对intent的包装,通常通过getActivity,getBroadcast,getService来得到pendingintent的实例,当前activity并不能马上启动它所包含的intent,而是在外部执行 pendingintent 时,调用intent的。正由于pendingintent中保存有当前App的Context,使它赋予外部App一种能力,使得外部App可以如同当前App一样的执行pendingintent里的 Intent, 就算在执行时当前App已经不存在了,也能通过存在pendingintent里的Context照样执行Intent。另外还可以处理intent执行后的操作。PendingIntent常和alermanger 和notificationmanager一起使用。
Intent一般是用作Activity、Service、BroadcastReceiver之间传递数据;而Pendingintent一般用在 Notification上,可以理解为延迟执行的intent,PendingIntent是对Intent一个包装。
getActivity(context:Context,requestCode:Int,intent:Intent,flags:Int)
getService(context:Context,requestCode:Int,intent:Intent,flags:Int)
getBroadcast(context:Context,requestCode:Int,intent:Intent,flags:Int)
requestCode 表示PendingIntent发送方的请求码,它会对PendingIntent的匹配产生影响,当PendingIntent包含的Intent相同,而且requestCode也相同,系统就为认为这是同样的PendingIntent(Extras不影响)。 flags常用的值有四个:
FLAG_ONE_SHOT表示该PendingIntent只能被使用一次,使用完之后就自动cancel。FLAG_NO_CREATE不会主动创建PendingIntent,如果之前不存在该PendingIntent,get方法返回null,调用失败。FLAG_CANCEL_CURRENT当前PendingIntent如果已经存在了,那么cancel掉存在的,然后重新创建一个。FLAG_UPDATE_CURRENT当前PendingIntent如果已经存在了,它们都会被更新,替换成新的Extras。
我们使用notify发送通知的时候,如果id相同,会被认为是同一个通知,更新通知的状态。如果发送一系列id不同,内容相同的通知(包括同样的PendingIntent),这时候点击事件就会根据不同的flag做出不同的判断了
系统会认为这一系列通知的PendingIntent是同样的,所以如果flag是FLAG_ONE_SHOT,第一个点击的通知会响应事件,剩余的通知在点击的时候就不会有动作了,因为PendingIntent已经被cancel。如果flag是FLAG_CANCEL_CURRENT,那么,每次发送一个通知,系统就会发现PendingIntent已经存在了,于是cancel掉存在的PendingIntent,再生成一个新的,只能给自己用,所以只有最后一个会被响应。如果是FLAG_UPDATE_CURRENT,每发送一条,它都会更新当前存在的所有PendingIntent,并替换为最新的Extras,所以,每个通知都会正常响应。
为通知设置事件,通常情况下这两个参数都设置为0就可以了:
 Intent intent = new Intent(this, SplashActivity.class);
  PendingIntent pi = PendingIntent.getActivity(this, 0 , intent, 0);
  builder.setContentIntent(pi)
设置PendingIntent有三个方法:
setContentIntent点击通知内容setDeleteIntent()通知被清除时setFullScreenIntent()全屏事件的Intent,比如在通话时。设置了该项,通知会以浮动的形式闪出
浮动通知是5.0新加的功能,如果通知的优先级设置较高,或者设置了setFullScreenIntent,通知到来的时候手机处于活动状态(点亮屏幕且未锁屏),这是通知会从顶部自动闪出,并且可以响应点击。
事件进阶-TaskStackBuilder
Android 中使用任务战来管理Activity,app 未启动,点击通知栏,进入通知详情界面,如果点击back,就会直接销毁当前Activity,直接返回桌面,如果我们想要返回该应用的首页,而不是退出,就要使用到TaskStackBuilder
//构建一个指向SplashActivity.class的intent
val intent = Intent(this,SplashActivity.class)
val stackBuilder = TackStackBuilder.create(this)
stackBuilder.addParentStack(SplashActivity.class)
stackBuilder.addNextIntent(intent)
val pi2 = stackBuidler.getPenddingIntent(0,0)
首先通过TaskStackBuilder.create(this)创建一个任务栈,下一步方法是addParentStack,这个方法比较奇葩,我们这里指定的是SplashActivity.class,实际上它添加的并不是SplashActivity。它需要与Manifest中的对应Activity的parentActivityName属性结合使用。
<activity
            android:name=".SplashActivity"
            android:label="@string/app_name"
            android:screenOrientation="portrait"
            android:parentActivityName=".DrawableActivity"
            >
SplashActivity指定了它的父Activity为DrawableActivity,所以我们调用addParentStack(SplashActivity.class)之后,此时返回栈中只是添加了DrawableActivity addNextIntent用来继续向返回栈添加Activity,这里才将SplashActivity添加进来。当然我们也可以继续创建指向其他Activity的Intent,使用addNextIntent向返回栈中添加新的Activity,最后添加的Activity处于最顶层,依次向下。(实际上addParentStack并不是必须的,系统使用addNextIntent添加Activity进栈时,仍然会读取它的android:parentActivityName并添加对应的父Activity。另外,请不要对被设为parentActivity的Activity再设置android:parentActivityName,会导致ANR)
使用TaskStackBuilder之后,不能根据intent来创建PendingIntent了,需要使用getPendingIntent方法,获取到之后设置给Notification,这样就实现了指定返回Activity的功能。
上面介绍了创建任务栈并管理其中的Activity,从而实现返回指定Activity的功能。但是,有时候我们需要的功能很简单,点击通知打开Activity,按下Back键返回桌面。此时,如果Activity所在的应用处于开启状态,新开启的Activity会直接添加到当前应用的栈中,所以按下Back之后返回的是应用而不是桌面。
<activity>
......
    android:taskAffinity=""  //指定任务栈的Affinity,与Intent的NEW_TASK相结合,在新的任务栈启动
    android:excludeFromRecents="true">//不显示在最近任务列表
</activity>
权限部分
在Android中,如果需要访问硬件设备的话,是需要对其进行授权的,所以需要在清单文件AndroidManifest.xml中增加两个授权,分别授予访问振动器与闪光灯的权限:
 <!-- 闪光灯权限 -->
 <uses-permission android:name="android.permission.FLASHLIGHT"/>
 <!-- 振动器权限 -->
 <uses-permission android:name="android.permission.VIBRATE"/>
- Notification.FLAG_SHOW_LIGHTS //三色灯提醒,在使用三色灯提醒时候必须加该标志符
-
Notification.FLAG_ONGOING_EVENT //发起正在运行事件(活动中)
-
Notification.FLAG_INSISTENT //让声音、振动无限循环,直到用户响应 (取消或者打开)
- Notification.FLAG_ONLY_ALERT_ONCE //发起Notification后,铃声和震动均只执行一次
- Notification.FLAG_AUTO_CANCEL //用户单击通知后自动消失
- Notification.FLAG_NO_CLEAR //只有全部清除时,Notification才会清除 ,不清楚该通知(QQ的通知无法清除,就是用的这个。还有百度通知栏里面的搜索框也是这个)。 使用方法:在设置完属性后,设置 Notification notification = builder.build(); notification.flags = Notification.FLAG_ONLY_ALERT_ONCE
通知的移除
NotificationManager.cancelAll()删除所有通知。NotificationManager.cancel(notificationId)删除特定通知。 NotificationManager.cancel(tag:String,id:Int),通过tag 和id来删除
 // 查询所有当前用户的所有渠道
 notificationManager.getNotificationChannels();
 // 查询所有当前用户的所有渠道组         notificationManager.getNotificationChannelGroups();
 // 根据ID删除渠道
notificationManager.deleteNotificationChannel("渠道ID")
  // 根据ID删除渠道    notificationManager.deleteNotificationChannel("测试组ID");