
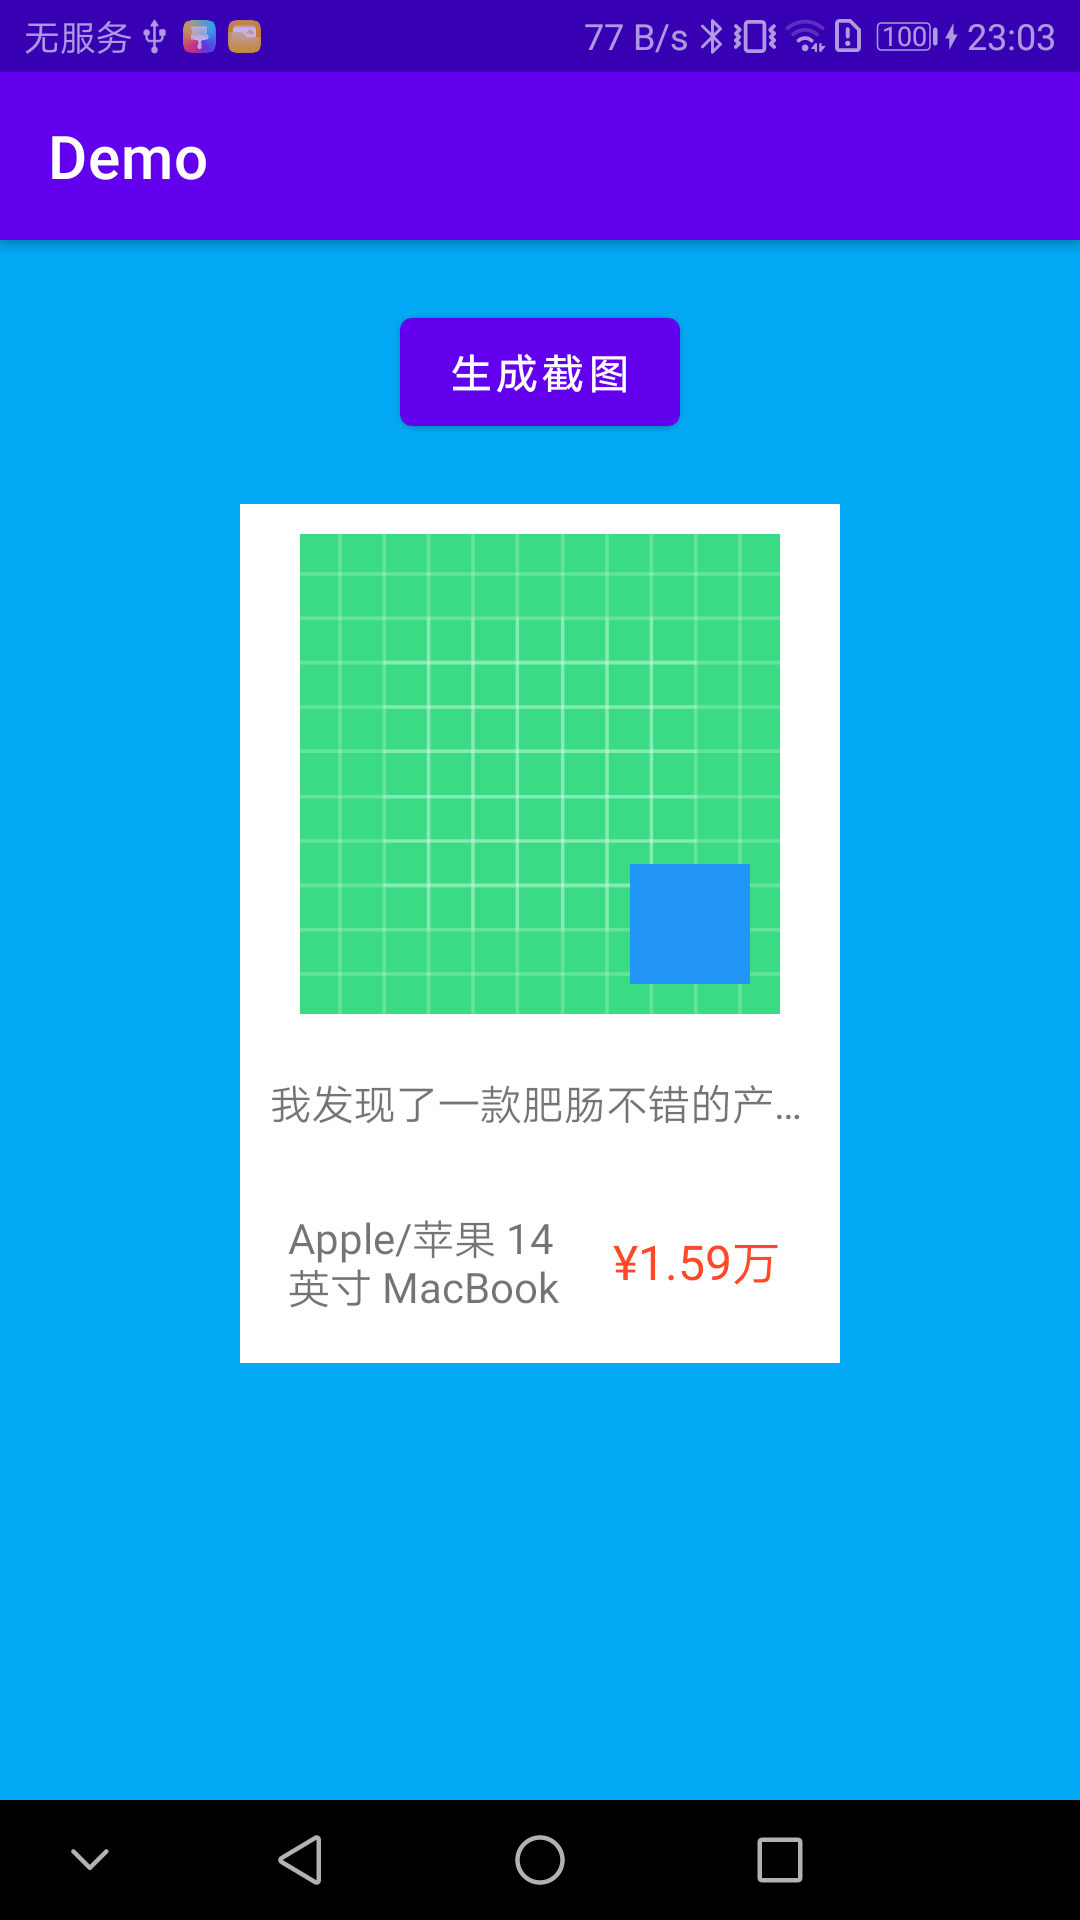
效果图
无图言*,上图!由于是 Demo 哈,所以就没有怎么美化,将就看啦~
前言
虽然咱们的标题叫《Android 开发过程中截图分享功能实现》,但是咱们本篇文章主要是讲截图功能的实现,分享功能的话其实没有必要讲的,因为各位同学需要分享到的平台可能不大相同,但是都有一个共同点,那就是分享的是图片文件或者图片文件的路径。
所以,我为什么要写这篇文章呢?因为我最近的项目里有一个需求,就是分享卡片图片。这个时候有的同学可能就坐不住了,分享卡片图片?我让做 UI 的同学切一个放 app 里不就好了吗?
是的,你大可以这么做。但是,各位同学注意了啊~ 你要知道,这个图片也是个文件,是要占内存的,也就是说如果要放到 app 里的话,那么势必会增大 apk 的体积。而且,咱们的这个卡片的布局排版一般都是固定的,变化的是内容,你总不能说让做 UI 的同学把每一种情况下的卡片都切一份吧,这肯定是不现实的。因为有很多情况下的内容数据都是从网上获取的,比如淘宝的商品分享卡片功能。
那么,有没有什么好办法呢?有!当然有啦~
实现思路
- 编写布局,排版
- 动态设置内容
- 截图
- 将截图保存为 file 文件
- 分享 file 文件或 file 路径
引入依赖(可选)
	// 使用 view.drawToBitmap() 扩展函数和 view.isInvisible 扩展属性时需要
	implementation 'androidx.core:core-ktx:1.7.0'
编写代码
这里我们一共有两个 xml 布局,一个是用来承载 触发截图按钮和显示截图效果的(screenshot_activity.xml),另一个是用来方便 布局分享卡片 的(screenshot_card_layout.xml)。
xml 布局
screenshot_activity.xml
<?xml version="1.0" encoding="utf-8"?>
<LinearLayout xmlns:android="http://schemas.android.com/apk/res/android"
    xmlns:tools="http://schemas.android.com/tools"
    android:layout_width="match_parent"
    android:layout_height="match_parent"
    android:background="#03A9F4"
    android:orientation="vertical"
    android:padding="20dp"
    tools:context=".ScreenshotActivity">

    <Button
        android:id="@+id/btn_create_screenshot"
        android:layout_width="wrap_content"
        android:layout_height="wrap_content"
        android:layout_gravity="center"
        android:text="生成截图" />

    <ImageView
        android:id="@+id/iv_screenshot"
        android:layout_width="match_parent"
        android:layout_height="wrap_content"
        android:layout_marginVertical="20dp"
        android:contentDescription="生成后的截图展示,实际开发时将会直接保存为 file 文件,以便分享发送" />

</LinearLayout>
screenshot_card_layout.xml
<?xml version="1.0" encoding="utf-8"?>
<LinearLayout xmlns:android="http://schemas.android.com/apk/res/android"
    android:layout_width="200dp"
    android:layout_height="wrap_content"
    android:background="#fff"
    android:orientation="vertical"
    android:padding="10dp">

    <FrameLayout
        android:layout_width="wrap_content"
        android:layout_height="wrap_content"
        android:layout_gravity="center">

        <ImageView
            android:id="@+id/iv_cover"
            android:layout_width="160dp"
            android:layout_height="160dp"
            android:layout_gravity="center"
            android:contentDescription="动态设置的商品封面"
            android:src="@drawable/ic_launcher_background" />

        <ImageView
            android:id="@+id/iv_qr_code"
            android:layout_width="40dp"
            android:layout_height="40dp"
            android:layout_gravity="end|bottom"
            android:layout_margin="10dp"
            android:background="#2196F3"
            android:contentDescription="动态设置的二维码" />

    </FrameLayout>

    <TextView
        android:layout_width="wrap_content"
        android:layout_height="wrap_content"
        android:layout_gravity="center"
        android:layout_marginVertical="10dp"
        android:contentDescription="假装我是分享语"
        android:ellipsize="end"
        android:maxLines="1"
        android:paddingVertical="10dp"
        android:text="我发现了一款肥肠不错的产品,你也来试试吧!" />

    <LinearLayout
        android:layout_width="match_parent"
        android:layout_height="wrap_content"
        android:gravity="center_vertical"
        android:orientation="horizontal">

        <TextView
            android:layout_width="0px"
            android:layout_height="wrap_content"
            android:layout_weight="1"
            android:contentDescription="假装我是标题"
            android:elevation="@dimen/cardview_compat_inset_shadow"
            android:maxLines="2"
            android:padding="6dp"
            android:text="Apple/苹果 14 英寸 MacBook Pro Apple M1 Pro 8 核中央处理器 14核图形处理器 16GB" />

        <TextView
            android:layout_width="wrap_content"
            android:layout_height="wrap_content"
            android:contentDescription="假装我是价格"
            android:padding="10dp"
            android:text="¥1.59万"
            android:textColor="#FB4828"
            android:textSize="16sp" />

    </LinearLayout>

</LinearLayout>
kotlin 代码
ScreenshotActivity.kt
Tips:别忘了在 AndroidManifest.xml 清单文件中注册哦~
import android.content.res.Resources
import android.graphics.Bitmap
import android.os.Bundle
import android.util.TypedValue
import android.view.LayoutInflater
import android.view.View
import android.view.ViewGroup
import android.widget.Button
import android.widget.ImageView
import androidx.appcompat.app.AppCompatActivity
import androidx.core.graphics.applyCanvas
import androidx.core.view.ViewCompat

class ScreenshotActivity : AppCompatActivity() {

    private val mBtnCrateScreenshot: Button by lazy { findViewById(R.id.btn_create_screenshot) }
    private val mIvScreenshot: ImageView by lazy { findViewById(R.id.iv_screenshot) }

    override fun onCreate(savedInstanceState: Bundle?) {
        super.onCreate(savedInstanceState)
        setContentView(R.layout.screenshot_activity)
        initEvent()
    }

    private fun initEvent() {
        mBtnCrateScreenshot.setOnClickListener {
            createQrCodeBitmap()
        }
    }

    private fun createQrCodeBitmap() {
        // 加载布局
        val layout = LayoutInflater.from(this).inflate(R.layout.screenshot_card_layout, null)
        // 将该布局隐藏,主要是防止用户看到,同时又不会影响布局的测量
        layout.isInvisible = true
        // 实际上,只要能添加到 View 视图树上即可保证后面的 post 方法执行
        val decorView = window.decorView as ViewGroup
        // 这里需要指定宽高,建议和布局中的一致,否则可能会留白太多
        decorView.addView(layout, ViewGroup.LayoutParams(200.dp, ViewGroup.LayoutParams.WRAP_CONTENT))
        // 需要等 view 布局完成后再执行截图操作(因为我们指定了宽高,所以不需要考虑 view 的测量问题)
        layout.post {
            // config 参数为生成的 bitmap 质量,一般来说 Bitmap.Config.RGB_565 就够了,根据实际开发需求进行调整
            // drawToBitmap 为 androidx.core.view 包下的官方扩展函数
            val bitmap = layout.drawToBitmap(config = Bitmap.Config.RGB_565)
            // 设置 bitmap 到 ImageView 展示效果,真实开发时直接保存为 file 文件,然后分享
            save2FileAndShare(bitmap)
            // 移除刚刚添加的 View(你也可以不移除,以便进行复用,根据实际开发需求进行调整)
            decorView.removeView(layout)
        }
    }

    /**
     * 保存文件并分享
     */
    private fun save2FileAndShare(bitmap: Bitmap) {
        // 这里通过设置 bitmap 到 ImageView 上替代保存文件和分享的步骤,也可以看到实际的截图效果
        mIvScreenshot.setImageBitmap(bitmap)
    }

    /**
     * Copy from androidx.core:core-ktx:1.7.0
     *
     * Return a [Bitmap] representation of this [View].
     *
     * The resulting bitmap will be the same width and height as this view's current layout
     * dimensions. This does not take into account any transformations such as scale or translation.
     *
     * Note, this will use the software rendering pipeline to draw the view to the bitmap. This may
     * result with different drawing to what is rendered on a hardware accelerated canvas (such as
     * the device screen).
     *
     * If this view has not been laid out this method will throw a [IllegalStateException].
     *
     * @param config Bitmap config of the desired bitmap. Defaults to [Bitmap.Config.ARGB_8888].
     */
    private fun View.drawToBitmap(config: Bitmap.Config = Bitmap.Config.ARGB_8888): Bitmap {
        if (!ViewCompat.isLaidOut(this)) {
            throw IllegalStateException("View needs to be laid out before calling drawToBitmap()")
        }
        return Bitmap.createBitmap(width, height, config).applyCanvas {
            translate(-scrollX.toFloat(), -scrollY.toFloat())
            draw(this)
        }
    }

    /**
     *
     * Copy from androidx.core:core-ktx:1.7.0
     *
     * Returns true when this view's visibility is [View.INVISIBLE], false otherwise.
     *
     * ```
     * if (view.isInvisible) {
     *     // Behavior...
     * }
     * ```
     *
     * Setting this property to true sets the visibility to [View.INVISIBLE], false to [View.VISIBLE].
     *
     * ```
     * view.isInvisible = true
     * ```
     */
    private inline var View.isInvisible: Boolean
        get() = visibility == View.INVISIBLE
        set(value) {
            visibility = if (value) View.INVISIBLE else View.VISIBLE
        }


    /**
     * Int 对象的扩展函数,方便转换为 dp
     */
    private val Int.dp
        get() = TypedValue.applyDimension(TypedValue.COMPLEX_UNIT_DIP, toFloat(), Resources.getSystem().displayMetrics)
            .toInt()
}
总结
代码也都很简单,不过第一次做这个功能的同学可能会遇到几个坑点。
- 加载的布局没有添加到 View 视图树上,导致未布局视图,不会执行 view.post 方法
- 未指定 View 的宽高,导致留白过多,不符合预期效果
如果对你有帮助的话,欢迎一键三连+关注哦~
本文由
A lonely cat
原创发布于
阳光沙滩
,未经作者授权,禁止转载